
Veney! It's sword chess!
(rhymes with betray)

Contents
OVERVIEW
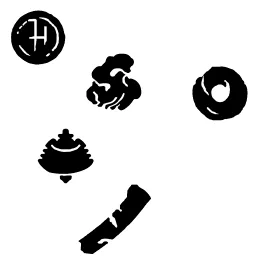
Fig.A Summary: The Pieces (In Brief)
2.0.I Introduction & Comparison to Chess
2.0.II Three Precepts of Spirit
2.0.III Playing with Sand
2.0.IV Overall Play & Goal
2.0.V The Board
2.0.VI Types of Pieces
2.0.VII Terminology: Take or Fend?
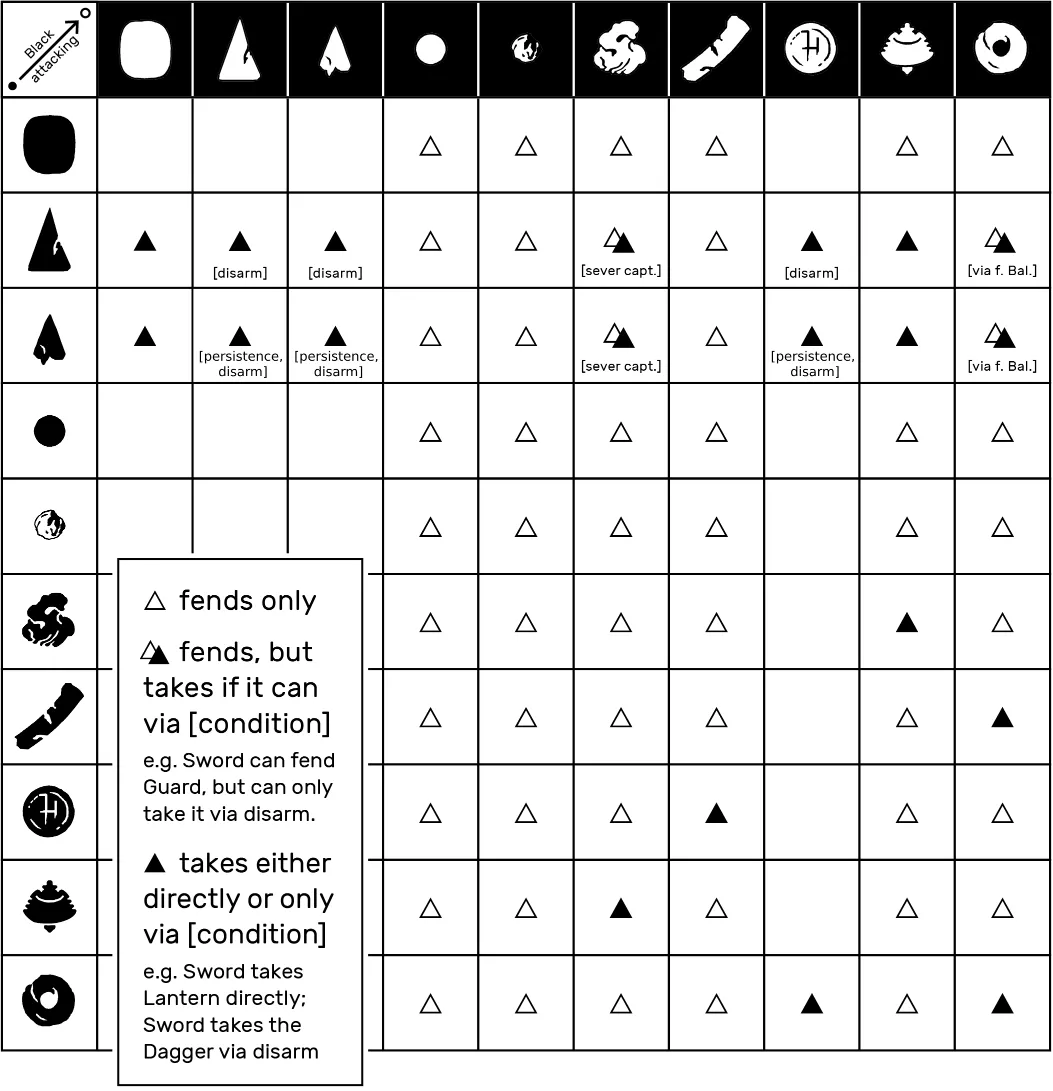
Fig.C Summary: Taking & Fending
RULES
2.0.01 The Pieces, Movements & Specials
2.0.02 Self
2.0.03 Sword
2.0.04 Engagement (pawn)
2.0.05 The Free Engagement
2.0.06 Cloak
2.0.07 Balance
2.0.08 Dagger
2.0.09 Guard
2.0.10 Lantern
2.0.11 Jutsu
2.0.12 Ruin/Rien
2.0.13 Placing & Withdrawing Pieces
2.0.14 Disarm
2.0.15 Double-Moves
2.0.16 Immaterial Actions
2.0.17 Passing
2.0.18 Devices of Art & Mysticism
2.0.19 Setting Up & Beginning a Game
2.0.20 Impasse & Other Edge Cases
2.0.21 Endings
2.0.22 Untenable Moves
Summary: The Pieces (In Brief)
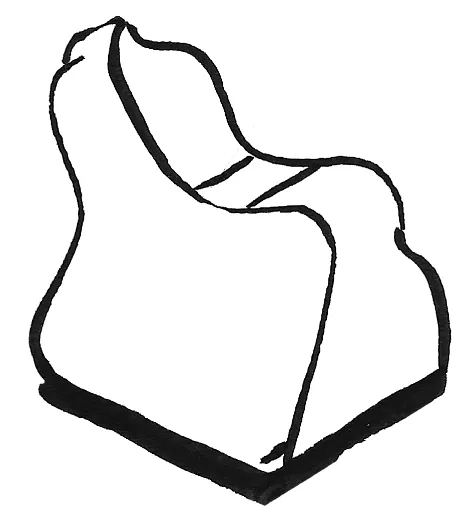
The Self
▪ Can take no pieces
▪ Can be checkmated
▪ Movement allows other pieces to advance and/or co-move
▪ Retreat can reset the entire board
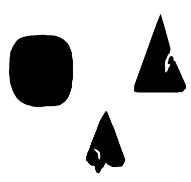
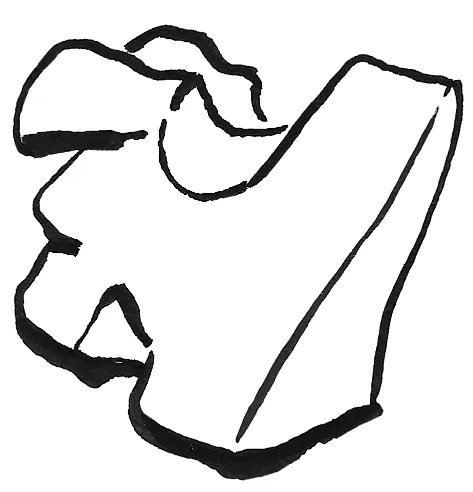
The Sword
▪ Range constrained to the Self piece
▪ Co-moves in concert with Self piece
▪ Can take most other pieces
▪ Can be checkmated
▪ Used to perform checkmate
▪ Pushes / interacts with opposing blades
The Engagements
▪ Four of them (whereas only one each of the other pieces)
▪ Can take no pieces
▪ Never permanently lost, only fended
▪ Act as stepping-stones to facilitate double-moves by your other pieces
The Cloak
▪ Extinguishes the Lantern
▪ Can immobilize the Sword temporarily
▪ Provides an escape to the Self
▪ Can be fended, i.e. temporarily removed from the board
The Balance
▪ Transcends the Jutsu
▪ Can trade places with your Sword
▪ Prevents Jutsu from entering its measure when in a measure with the Self
▪ Can be fended
The Dagger
▪ Constrained closer to the Self
▪ Co-moves in concert with Self piece
▪ Player with this piece in play survives if the Sword is lost
▪ Can be used for a special thrown attack
▪ Blade-to-blade moves (like Sword) only on opposing Dagger
The Guard
▪ Bludgeons Balance
▪ Deflects blades
▪ Can co-move in concert with the Self, like Sword/Dagger
The Lantern
▪ Burns the Cloak
▪ Long-range “Glare” attack against Self fends Jutsu
▪ Can be fended
The Jutsu
▪ Subverts the Guard, negates the other Jutsu and itself
▪ Prevents piece drops while in measure with the Self
▪ Used for feinting “intention”
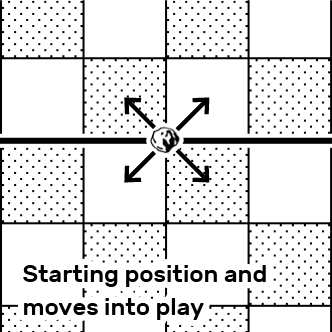
The Free Engagement
▪ Moves like a King to open squares or attacks diagonally as if it were your own pawn
▪ “Meta-moves” on lines of the grid before entering play
The Ruin/Rien

▪ Moves to any open square (but with range constraints)
▪ Inert: Cannot take or fend any piece
▪ Cannot be taken or fended
▪ Antistrategic significance

Introduction & Comparison to Chess
It isn't strictly necessary to know how to play chess in order to play Veney, but chess is indeed the starting point for the basic shape of the game. The following summarizes the game's significant twists on the rules of modern chess:
- There is no check. “Check” is not called or enforced as in chess. A player in check isn't required to notice it or to move out of check.
- Checkmate must be “followed through.” Checkmate is performed by actually taking the piece in question.
- Two-way checkmates are possible. If a player is checkmated, it may be possible for them to checkmate in return. If they see this possibility and seize upon it, then both players have lost. This is like a draw, but worse, because you're both dead instead of both alive.
- More checkmate-able pieces, fewer checkmate-ing pieces. Each player has two pieces which are at risk of being taken for a checkmate: the Self and the Sword (or sometimes Dagger), and only one kind of piece which is able to perform a checkmate: a blade, namely the Sword.
- Replaceable pieces. Most pieces attacked are not “captured,” but rather returned to their owner, who often keeps them in reserve and can put them back into play. As in fencing, the emphasis is on the position.
- Reserved pieces. Each player starts with additional pieces in reserve which can be put into play. Pieces can also be withdrawn off the board into reserve.
- Lost pieces. Pieces are sometimes lost and removed from the game without going back into reserve, just like in chess.
- Rock, Paper, Scissors. Each piece has the ability to remove only certain other pieces from the game, like rock-paper-scissors, and via different techniques.
- Special abilities. Certain pieces interact with each other uniquely and execute special moves, like trading places or immobilizing the opponent's Sword.
- Passing is allowed. One may choose to “pass” a turn without making a move unless the opponent refuses their pass.
- Double-moves. The players often make two moves or actions in one turn. For example, when the Self moves, the Sword can also move. There are several vectors for double-moves, but they never combine beyond a limit of two moves total.
- No promotion. Neither pawns nor any other piece can promote. Pawns are compensated with other qualities.
- Stepping-stone pawns. Each player can use their “engagements” (pawns) as stepping stones which grant a second move with the same piece that took the pawn's square. This allows for more complex and surprising movements.
- One piece is shared. The free engagement, a pawn which starts in the center of the board, can be controlled by either player.
- You must take risks. Some pieces are constrained by distance to your Self piece. One purpose of this is that in order to attack your opponent, you must bring forward your critical piece, thus risking its safety in return.
- A board of boards. To achieve the above described range constraints, the board is subdivided into four measures, one successively after the next in a row between the two players.
- Room to retreat. Each player starts with space retreat into.
- …and the board may reset. It's possible for one player to retreat and reset the entire board without starting a new game.
- A shared axis of attack and defense. Where chess games are played through subterfuge and networked entanglement across a wider field, the shape of this game is much narrower and more direct; it can be thought of in terms of a more condensed game of chess taking place as a gateway between two attacking / defending poles.
- Breaking the rules is a part of the game: A move which breaks the constraints laid out for that piece can be simply called out and reverted or seized upon as vulnerability for attack.
- Chaos & Order are intentional themes. The game is, at present, intentionally over-complicated and open to experimentation, interpretation, and improvement. It will probably change and develop over time—as have the tactics and conventions of both chess and martial arts.
All of the above are designed to make a chess variant more akin to fencing, but the actual cumulative result of these abstractions is arguably far less apprehensible (and certainly less intuitive) than any kind of physical fight. Ultimately, what it amounts to is open for interpretation.
Three Precepts of Spirit
-
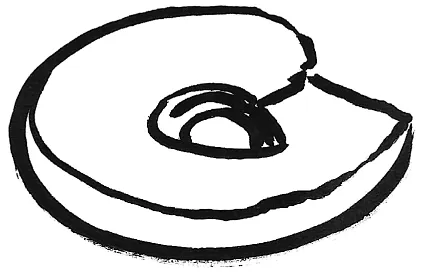
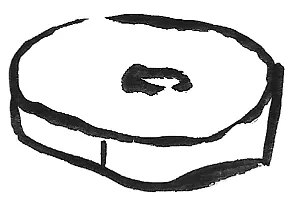
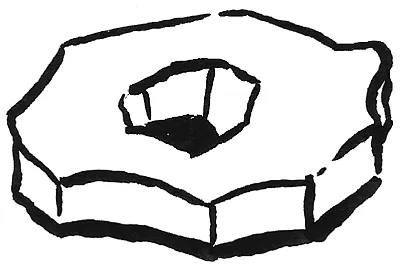
The ideal set is made with found and collected rocks, shells, bones, and other bits of this and that.
-
You can play a casual game with one complete set, or you can play for keeps in a formal game using a token from your own collection as your Self piece; at the end of a game, the checkmated player gives their token to the winner. If you both die, you trade and keep one another's tokens.
- Optionally, some may choose to call their unique Self tokens something special. It is still the basic Self piece for all intents and purposes, but you could also call it your Fighter or your Fencer; you could say that traditionally one player in your set is the Fool and the other is the Devil; or you could call your token by the name of a character it's meant to embody. It may be unclear whether you play as yourself or as a persona.
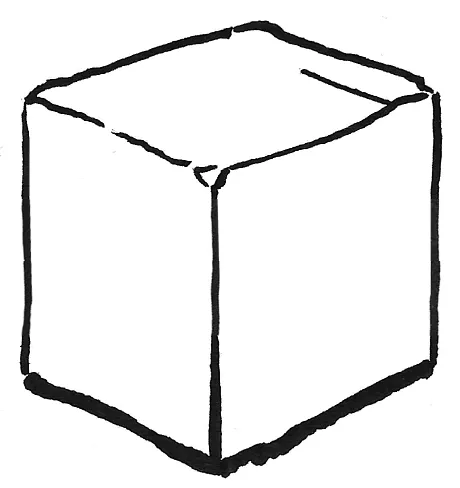
If you want to quickly get a makeshift set together in order to actually play, you can simply use marked/modified checkers and chess pieces, things found around the house, or even just draw identifying letters or symbols on simple rocks, on coins, on pieces of paper or cardboard, bits of tile or wood, etc. You could also carve or sculpt pieces from all kinds of materials; your options are endless. Take a trip to the hardware store. It's always better to be creative than to be hampered by any kind of dogma. What I'm offering here is simply my own version.
It's also possible to play with half a set, missing many of the non-critical pieces. (See: Custom Rules & Extra in the long version.)
Playing with Sand
The lengthy complex of rules which follows can be viewed as an experimental sandbox* of game mechanisms and fencing-analogues. Things will change, get dropped, merged or refined over time. This isn’t quite an “open beta,” because there’s no product; there will never be a final version. But it’s something like that.
*To sort of misuse the term
Overall Play & Goal
The goal of the game is to use your blade to checkmate your opponent either by touch (taking the Self piece) or by disarm (taking their only blade piece) while defending against checkmate in return.
On your turn, you may make one or possibly two of several actions.
- Move: Move one of your pieces already on the board to an open square.
- Take/Fend: Move one of your pieces to a square where it takes or fends another piece.
- ...You can do either of the above with the free engagement, a piece shared by both players.
- Place: Place a piece from your reserve onto the board.
- Withdraw: Put one of your pieces already on the board back into reserve.
- Pass: Pass a turn and do nothing.
- Special Move: Invoke various special moves and aspects of your pieces to perform certain actions not described above.
Additionally, before taking any of these actions, you have the option to first reposition the free engagement if it is not yet in play and then take your regular turn. (More on this later, see: free engagement).
You also can call out an opponent's untenable move for a penalty (or not, depending on how you agree to play), but this isn't a move.
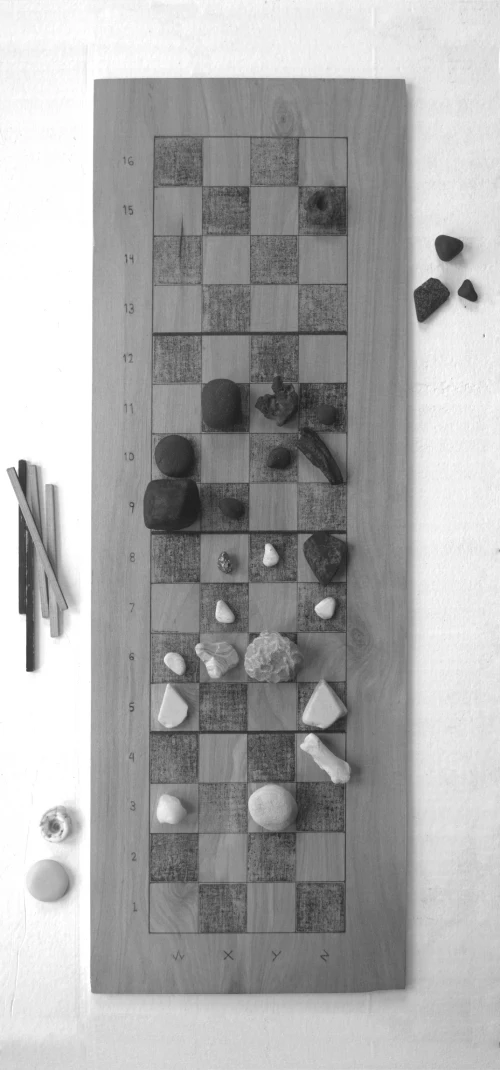
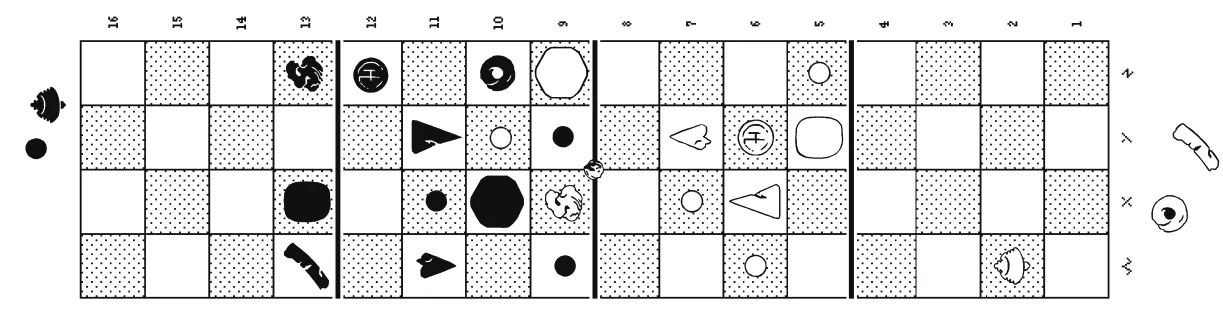
The Board
The board consists of 64 spaces arranged in a 4x16 square grid, like a chess board in a longer, narrower configuration. The two players sit facing each other on either end of the board, like the fencing piste.
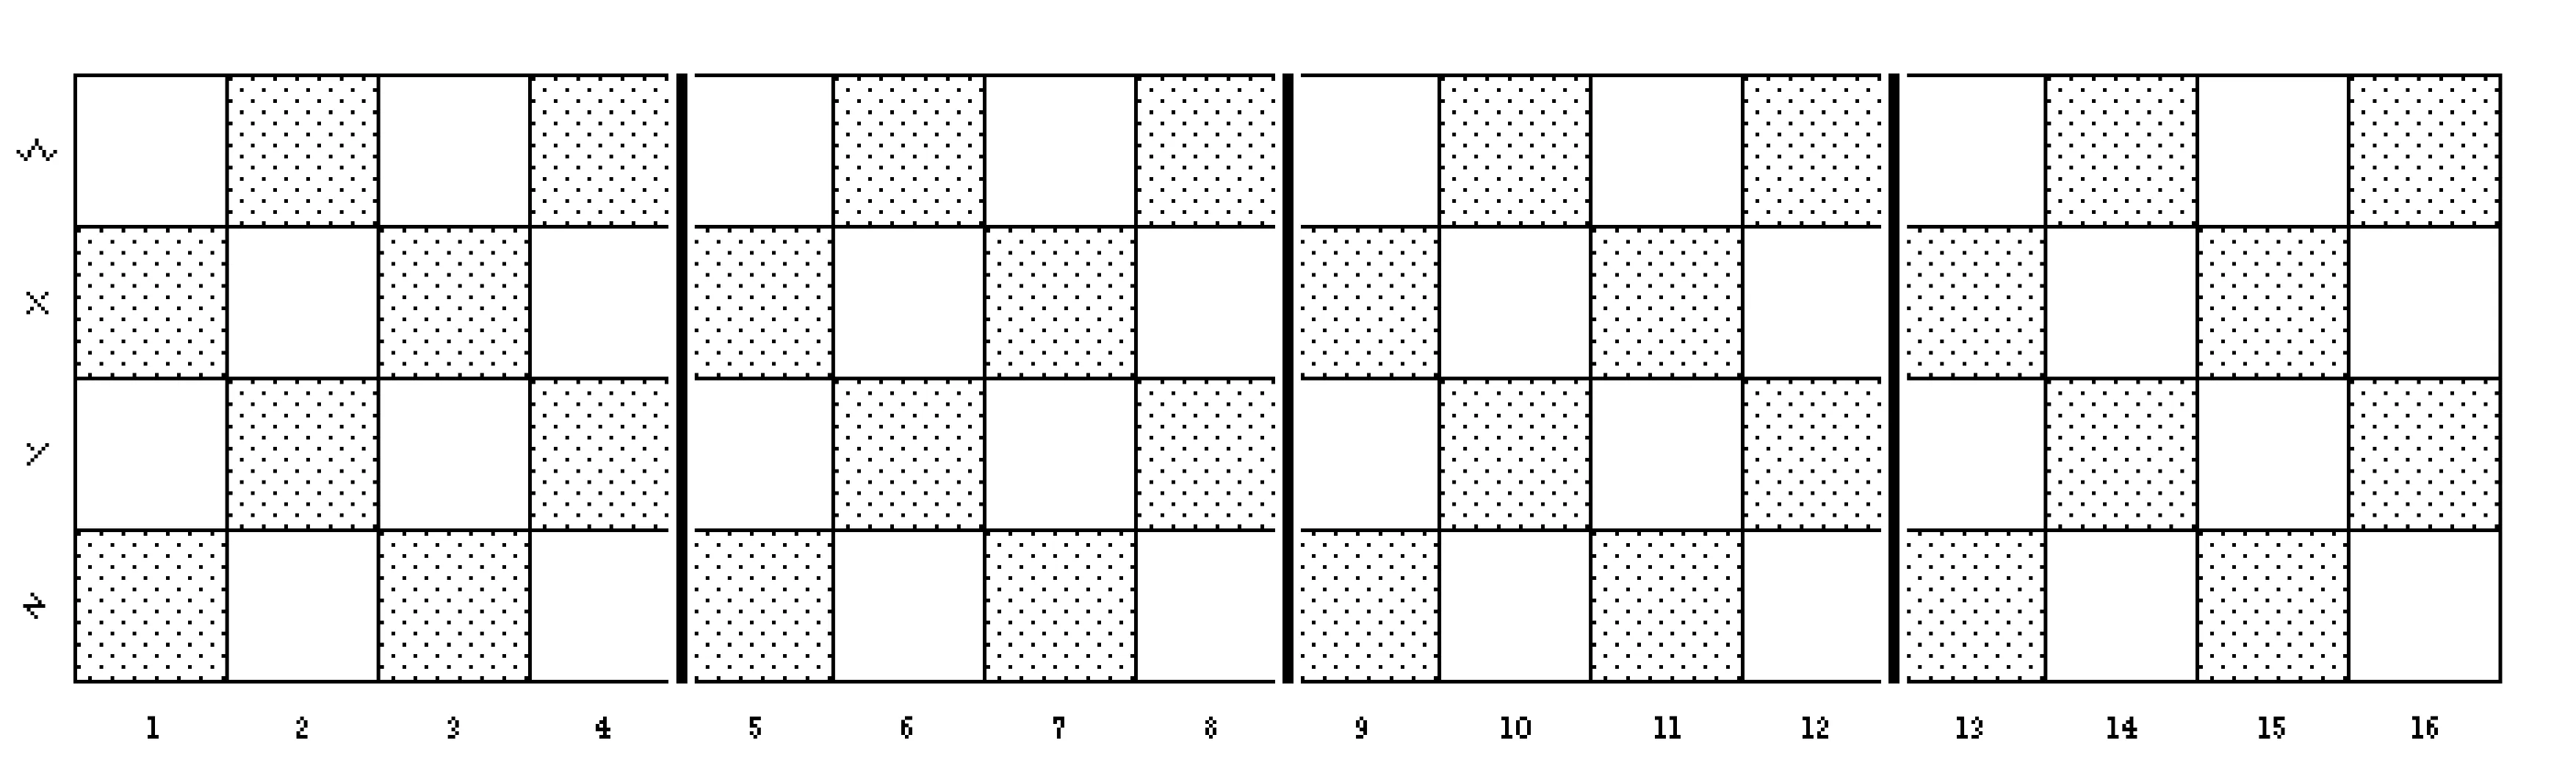
The board is additionally divided lengthwise into four measures, each of which is a 4x4 square grid. The line dividing the middle two measures can also be said to separate the board into two sides, your side and your opponent's.
The squares are shaded or otherwise marked in an alternating pattern, like a chess board. This is not strictly necessary in chess, but here it serves a mechanical purpose for a special piece. Each player should have a light square at their left hand (W1 is a light square).
The sixteen lateral rows of spaces, each four-squares-wide, are called steps, recalling distance closed between two fencers. The four lengthwise rows of spaces, each sixteen-squares-long, are called lines, representing the lines of offense and defense through which a fencer maneuvers their faculties.
Any row of four diagonally adjacent squares can be called simply a diagonal, as they are in chess.
To specify squares, the steps are labeled 1–16, and the lines are labeled W, X, Y, and Z.
To make a set more usable for Blind players, one can affix flat rails along the lines of the grid, like a Senet board. This has other benefits described in the full version of the rules.
Types of Pieces
Pieces can be instructively thought of as belonging to one of three categories: Critical pieces (Self and Sword or Dagger), Virtual pieces (engagements and the free engagement), and Technical pieces (Cloak, Balance, Lantern, Jutsu, and Guard).
- Critical (Major) pieces: The loss of these is what results in a game over. You need both a self and a sword to fight with. One piece is your life, and the other is how you take life. One (the sword) can take all, and the other (the self) almost none. Both are irreplaceable. (Dagger is considered critical if Sword is lost.)
- Virtual (Minor) pieces: The purpose of the engagements is to outline and facilitate the movement and strength of your sword, to allow for more flexible, complex, and surprising actions by other pieces, and to provide controlled points for your better pieces to defend. They cannot remove any other piece from the game permanently, and they are entirely replaceable. They help to structure the board and the shape of play, like pawns, but can accomplish very little on their own. They also have a virtual function as a sort of wager when expended for a double-move.
- Technical (Middle) pieces: These are expendable and often replaceable like engagements, but they are more singularly valuable as they have greater mobility and more complex movements, as well as special moves and aspects that can quickly reshape a moment in the game. Their special uses make them effective on their own, but they are still not capable of taking a critical piece for a checkmate. They can only take or fend other technical pieces and engagements. You can also lose one permanently, to your detriment, but it's not game over. They function on a “technical,” augmentational level to support your critical pieces, to fight for space, and interfere with your opponent's position.
Additional categorizations of pieces useful for explanatory shorthand are the blades, referring of course to the Sword and Dagger, and the armaments, which includes the Sword, Dagger, and Guard—these pieces are vulnerable to disarm. The armaments are all constrained by movement to the Self in some way, but are also allowed double-moves in concert with the Self.
The fendable pieces are all except for the Self, Sword, Dagger, Guard, and the Ruin/Rien (see next section on fending).
 Note: The Ruin/Rien, an optional piece, does not fit into this framework. It's most like a technical piece, but its inert role among other pieces disqualifies it from most everything of what the rules have to say about technical pieces.
Terminology: Take or Fend?
There are two different kinds of “taking” a piece in this game: take and fend. When an opponent's piece is taken, the attacking player literally takes the piece and removes it from the game permanently—just like in chess. Most often, however, a piece is instead fended, i.e. returned to its owner's reserve. Your pieces can also be withdrawn. These distinctions make it necessary to clarify our terminology in order to talk about the game. Pieces are not “captured” as they are in chess.
Summary: Taking & Fending
(Black attacking in below chart)
It's not necessary to immediately review these rules in detail, but here's a chart for future reference. In general, the take / fend relationships are as follows:
- Critical pieces and armaments are never fended, only taken. All other pieces are fendable.
- All pieces fend all non-armament, non-critical pieces (unless they can take).
- Armaments (Sword, Dagger, Guard) are only taken by disarm, except for Jutsu's subversion of Guard.
- Blades take middle/technical pieces according to certain piece-to-piece relationships.
- Middle pieces take each other via rock-paper-scissors loops.
- Engagements (including free engagement) are never taken, only fended, and can take no pieces.
All your pieces (except Ruin) can also step-stone your own engagements.
The Ruin/Rien is inert and not included here.
The Pieces, Their Movements & Specials
A Note on Abstraction
Most of these pieces are named after real things which can be used in fencing, but the game does not necessarily insist that they literally represent those things.
For the purposes of these rules, the term “adjacent” refers to the position of two pieces which are in squares that touch either orthogonally (sharing a side) or diagonally (sharing a corner).

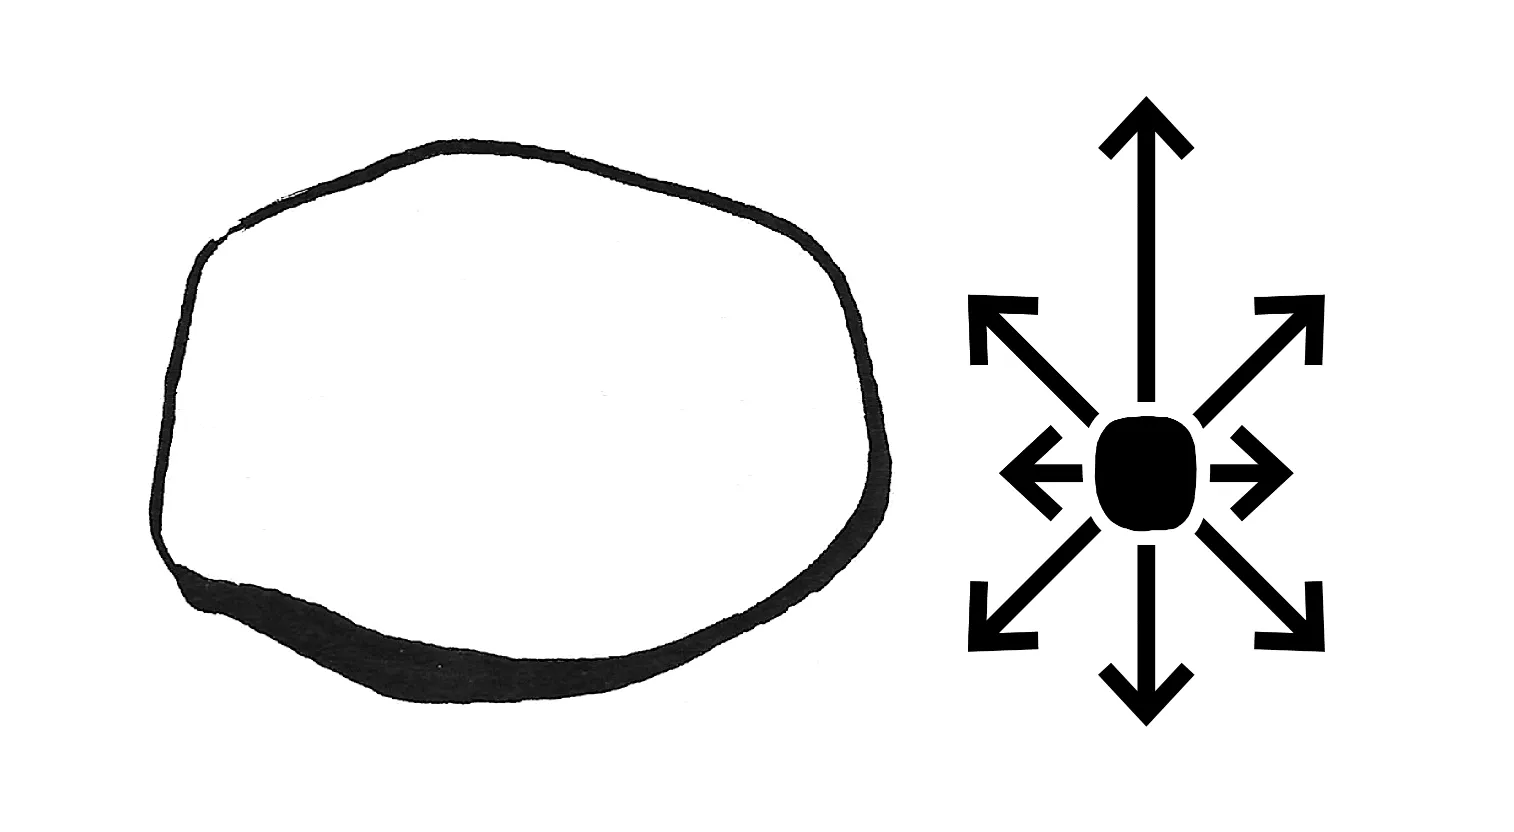
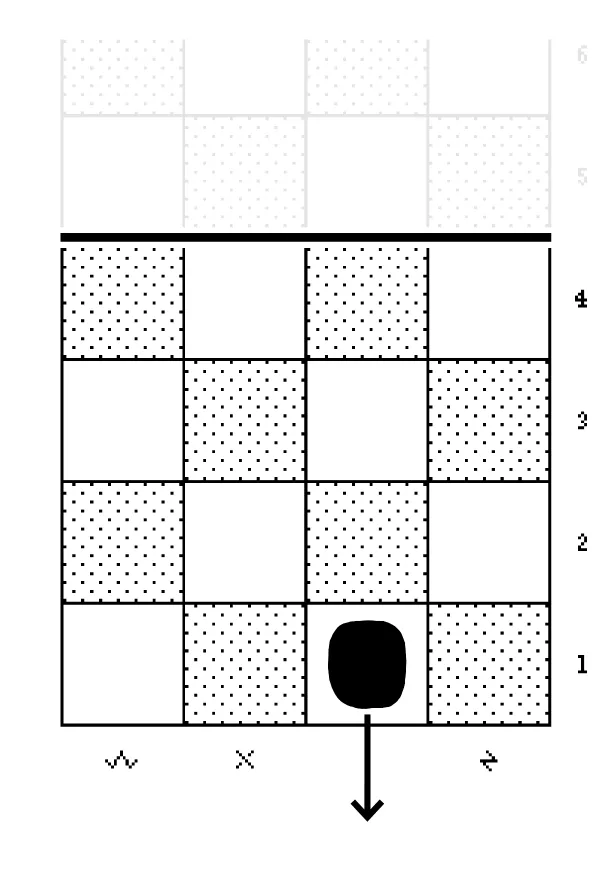
Self
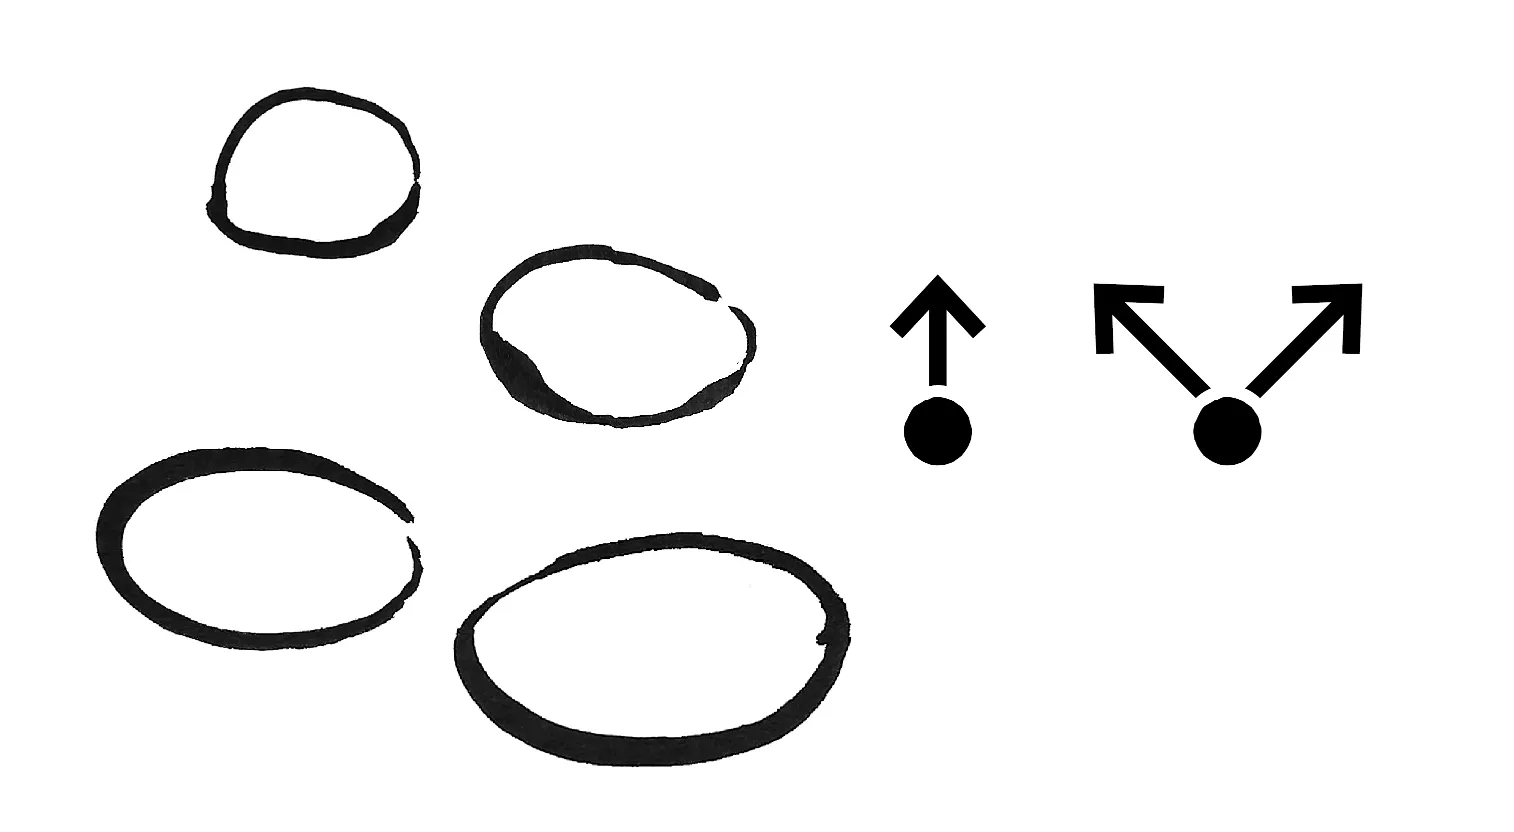
The Self piece is analogous to the king in chess. Its basic move is the same: one square in any direction, orthogonally or diagonally. Additionally, it can lunge forward and return backward (straight or diagonally) more than one space, depending on which measure it moves from. The Self cannot leap over pieces.
The sequence to remember is 4, 3, 2, 1. From the first measure, the Self can lunge forward (or diagonally forward) up to 4 spaces and only step back 1 space. These distances are increased or decreased as you go up and down the measures. From the second measure, the Self can lunge forward up to 3 and return as many as 2 spaces. In the third measure, it can lunge forward 2 and return as many as 3 spaces, and in the fourth measure it can only step forward 1 but can return a full 4 spaces.
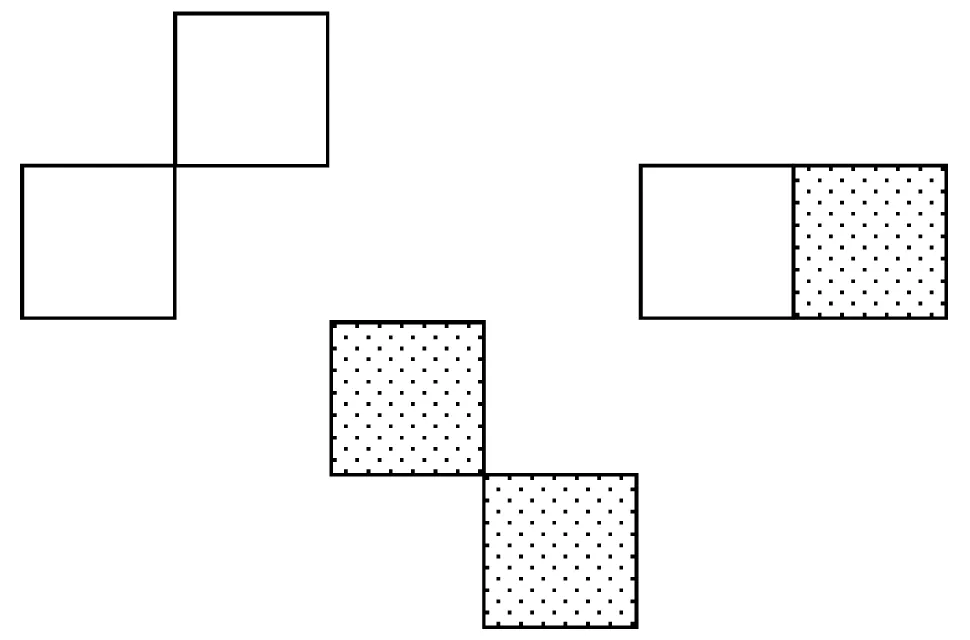
Below: Some examples of the Self's available movements.
Taking: The Self can only fend your opponent's fendable pieces as well as the free engagement, and can move by stepping-stones through your own engagements.
Vulnerability: Can only be taken by the Sword or Dagger (checkmate).
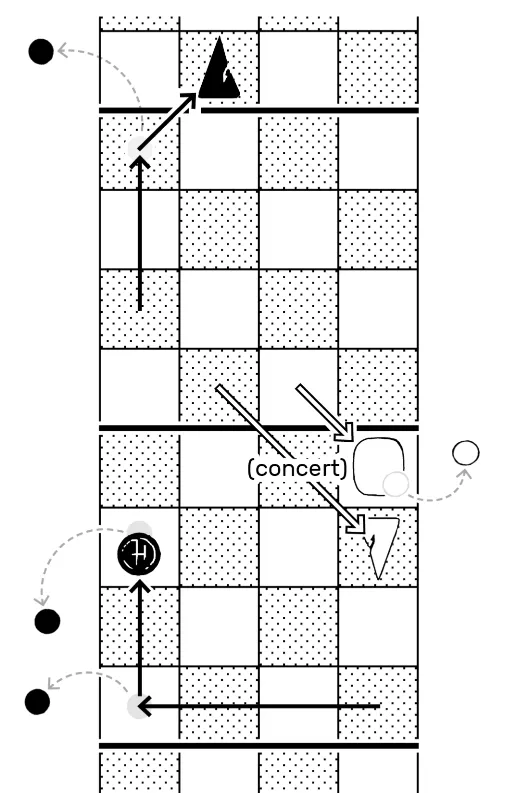
Aspect: Concert
When the Self moves, the Sword or an armament may also move simultaneously, in concert with the Self. The two pieces move without blocking one another (as with a “castling” move in chess).
The armament's range constraint is based on the position of the Self at the end of this double-move.
Note: Self and armament moves in concert can be combined with stepping stones, but the engagements don't grant an extra move (because you must pick one method of making a maximum two moves). For more on this, see Double-Moves.
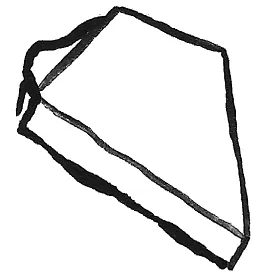
Special move: Retreat
If the Self steps back four steps in the first measure to leave the board entirely (requiring four turns), this player has played a retreat. The board is reset and play continues without starting a new game. However, lost pieces stay discarded and are not replaced on the board or in reserve upon retreat.
Retreat is impossible if your opponent's Self piece is on your side of the board. This means that it tends to never happen if your opponent doesn't allow it.
It is not possible to retreat off your opponent's end of the board, which has to do with the abstracted notions of directionality which define the space of the game. For more on this, see and the notes on “Directionality” in the Impasse & Other Edge Cases section of the full rules.
For many other details on how to handle this obscure move, see Retreat in the full rules.
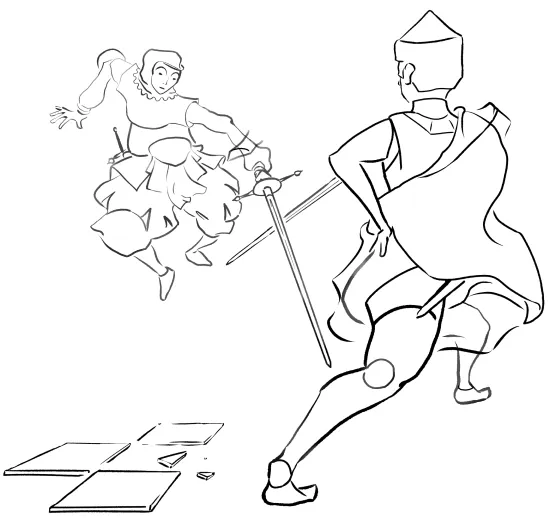
Below: The Self retreats off the board


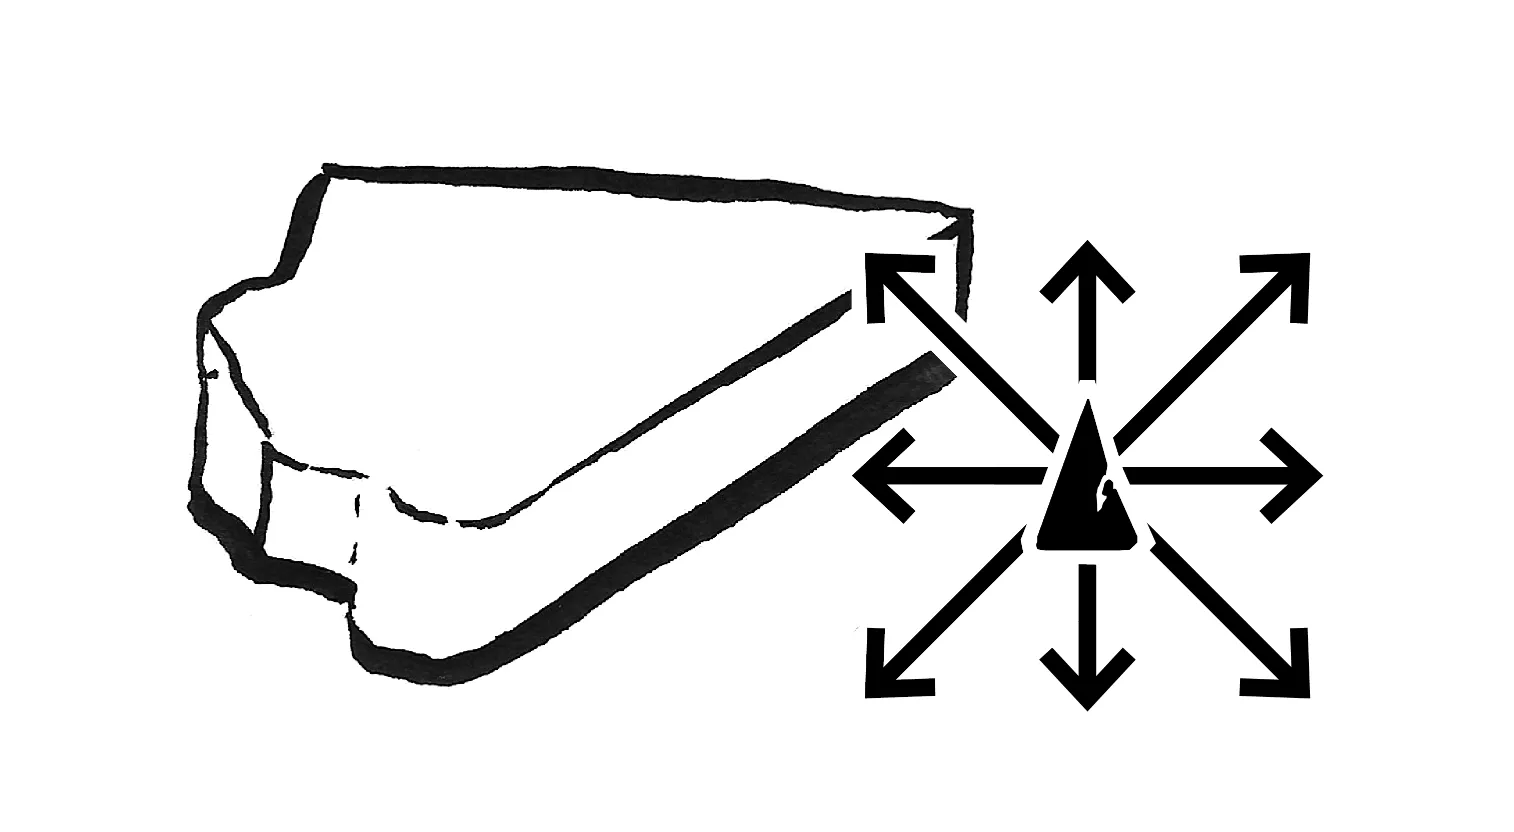
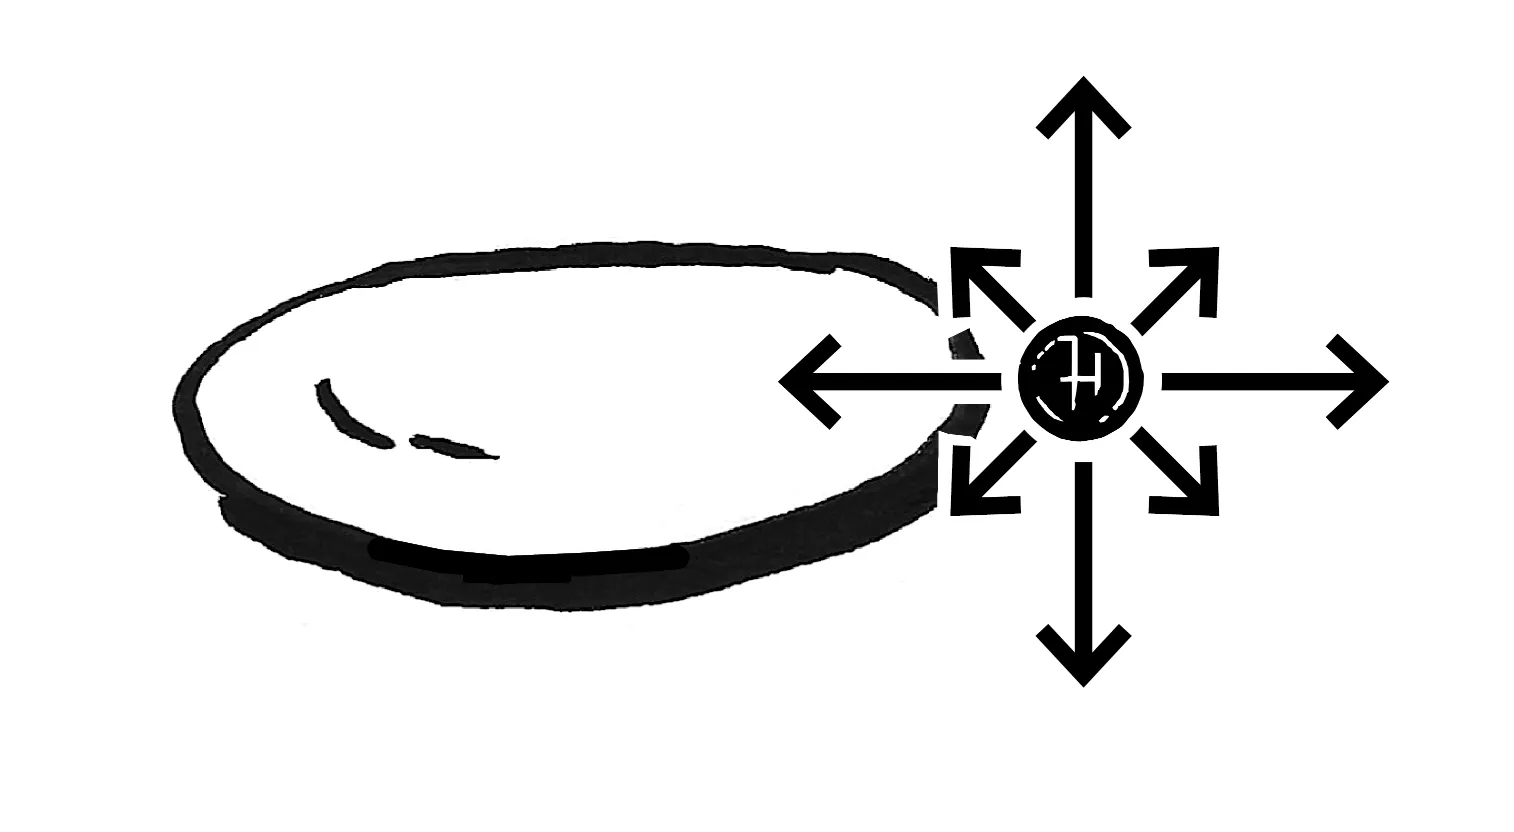
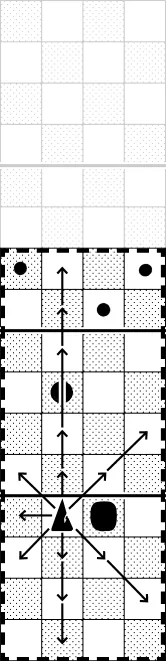
Sword
The Sword piece is analogous to the queen in chess. It is your most powerful piece, used to checkmate, and you only have one. If you lose your Queen in chess, and your opponent still has theirs, it is commonly understood that you are doomed. This isn't necessarily always true in chess, but with regards to a sword it is a near certainty.
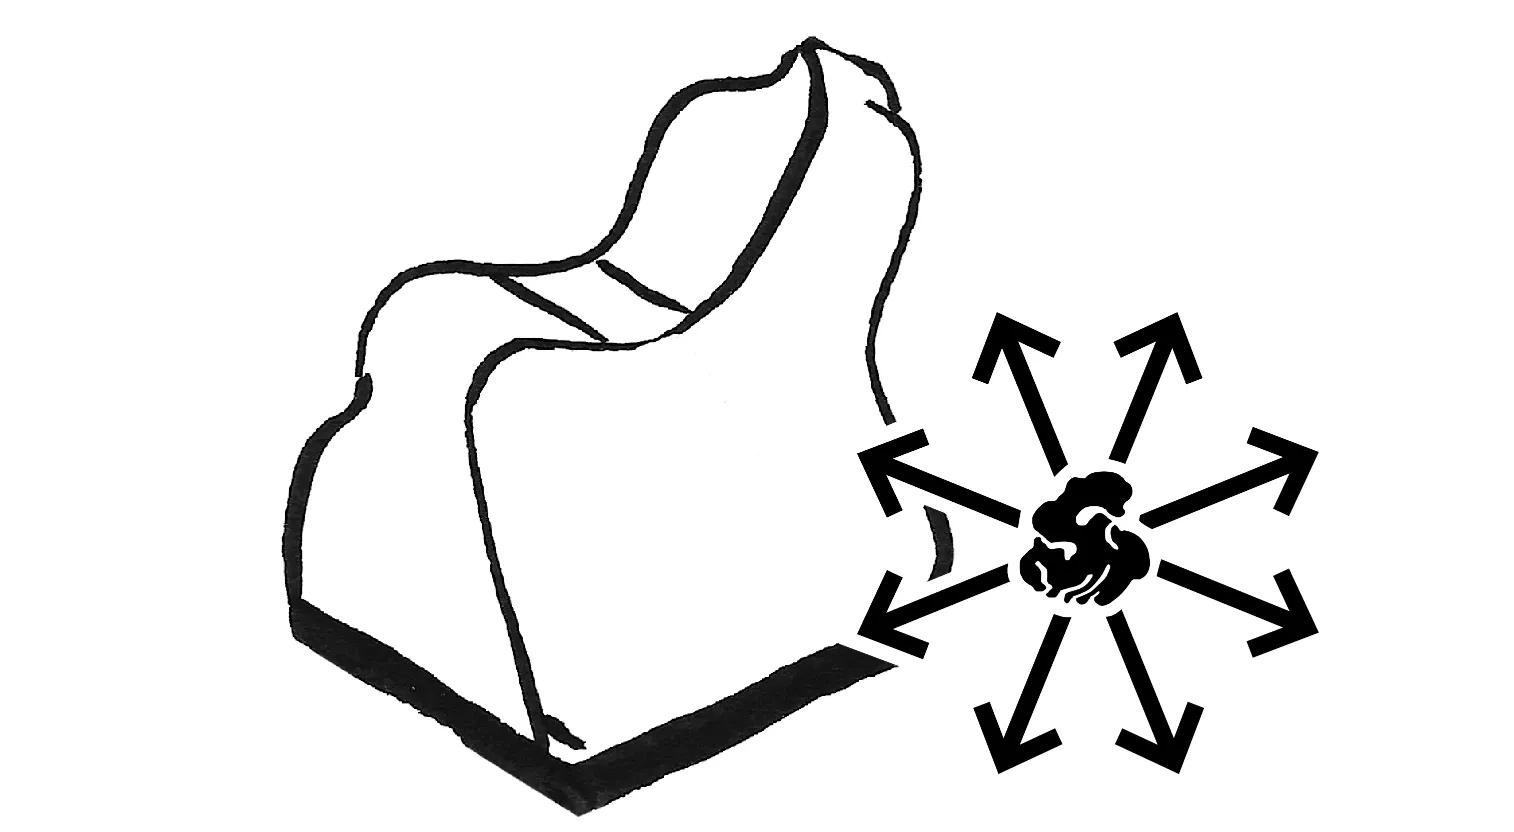
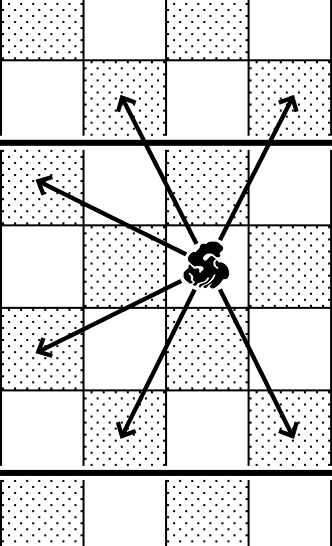
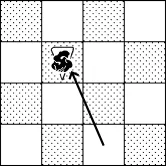
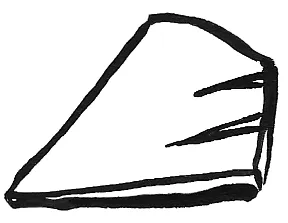
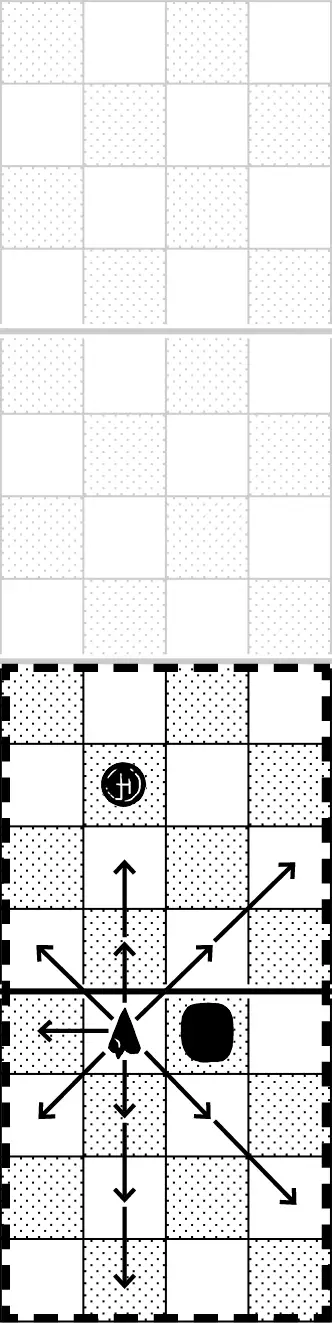
The Sword moves like a queen—any number of spaces in any direction, orthogonally or diagonally—but only within certain range constraints. It can only move in a measure either the same as that which is occupied by the Self or one measure outside of it (in either direction), plus any step further if you have at least one engagement in that step. (Thus, a Sword can certainly never reach an opponent so long as both players' Self pieces haven't advanced out of their first measure.)
The Sword can leap over any of your own pieces except the Self (since you can't, or shouldn't, pass a sword through your own body).
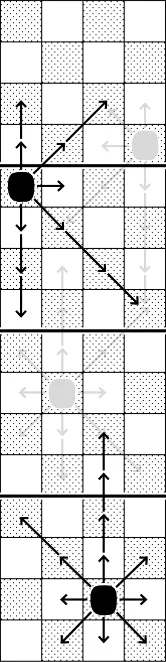
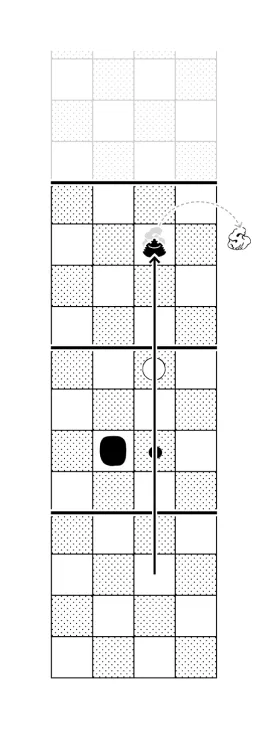
Below: An example of the Sword's range [within the dotted lines] and available movements [actual movement capabilities indicated by the arrows].
Your Sword is the primary piece used to take the opposing Self for checkmate, although the Dagger technically can as well.
Taking: The Sword fends all opposing fendable pieces unless it can take as follows…
- Balance is never taken, only fended.
- Lantern is always taken, directly (shattered).
- Cloak is only taken in counter-action, by cutting free from its special move (severed).
- Jutsu is taken indirectly, by fending Balance (shadow-stabbing).
- Engagements are only fended.
- Armaments — Sword, Guard, and Dagger — are taken only via conditions of disarmament.
- Self is taken directly, as checkmate.
- Ruin/Rien cannot be taken or fended.
Vulnerability: The Sword cannot be fended, and can only be taken by the opposing player's Sword (or Dagger, if their Sword is lost) via disarm conditions.
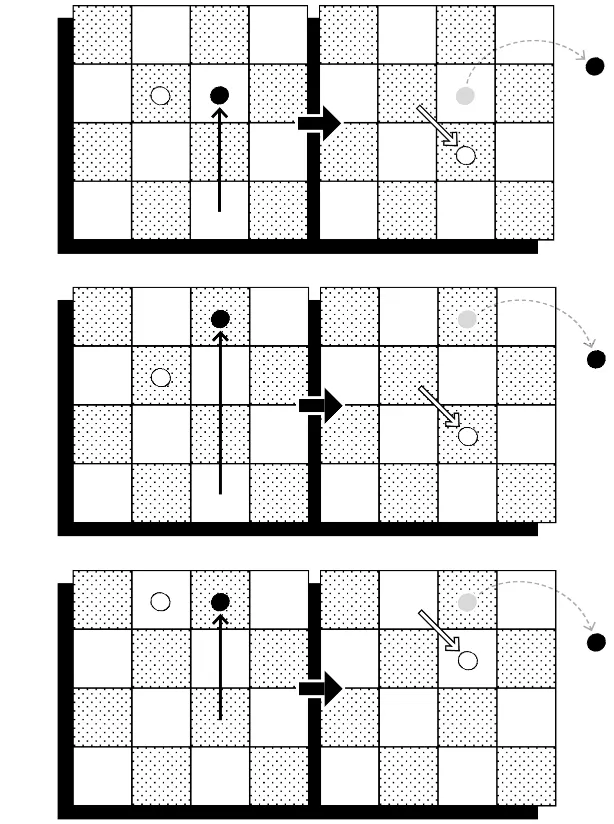
Special move: Cavazione (Offensive)
You may trade your Sword's place with an opponent's blade by cavazione when the two pieces are adjacent (orthogonally or diagonally) both on your opponent's side of the board.
This can be the second in a double-move by stepping-stone (see engagement) or a move in concert with the Self.
Special move: Opposition (Defensive)
Your Sword may push an opponent's blade by opposition when the two pieces are in-line with one another, unobstructed, and both on your side of the board. This move can travel any distance into consecutive open squares, in a straight line, without moving your Sword beyond the center line.
This too can be the second in a stepping-stone double-move or a move in concert with the Self.
The opponent's blade may be pushed beyond its normal constraints, potentially an effective method of trapping a blade for disarm.
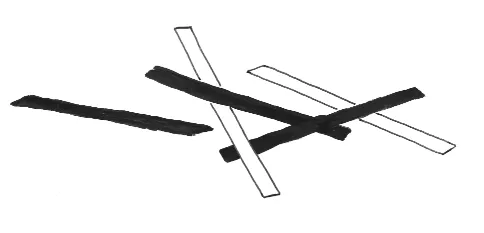
Below: Examples where the black Sword initiates Cavazione and Opposition


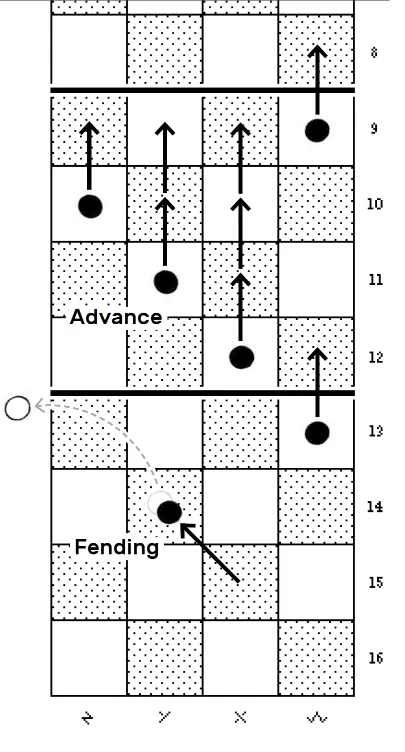
Engagement ...or “pawn”
The Engagements (called “pawns” for short) move like pawns in chess, one step forward into an open square, or one step diagonally forward to take an opposing piece.

Similar to chess, they can advance more than one step within your second measure. Since the board is longer, we allow them to move forward 1–3 spaces until they reach the center line, as long as they aren't blocked (not only on their first move, as in chess). Engagements cannot leap over pieces.
Below: Pawn movements
Taking: Engagements fend other fendable pieces, but take nothing.
Vulnerability: Engagements are fended by all pieces. Engagements are never taken.
Aspect: Stepping Stones
Any of your own pieces may move onto the square occupied by one of your own engagements, which is then removed from the board to reserve. This is called a step-stone move, or simply stepping stones.
The piece that moves by stepping stone is also granted the option to make a second move from that square on the same turn. This is called a double-move by stepping stone, or a double-move by engagement.
A double-move never leads to a third; you can take two engagements but the second doesn't grant another move. You are also making a wager with stepping stones; is it worth the temporary loss of a pawn? If you ever want to replace it, you will need to use a whole move to do so.
Below: Three examples of double-moves with a stepping stone. In the white example, the Sword actually moves by concert.
Special move: En passant
Just as in chess, your pawns are vulnerable to en passant when they move more than one space and pass an opposing pawn that threatens the first of these squares. The opponent's pawn may fend as if yours had made only a one-square move.
Below: Three examples of en passant


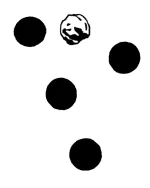
The Free Engagement
...credit to The Verdigris Pawn, by Alysa Wishingrad
This shared piece begins the game in the exact center of the board, on the intersection of the central grid lines, out of play. To put it into play, one player may move it into any open space of the four squares it touches (this move cannot be used to take a piece). From there, a player may move the free engagement as follows:
When in play, the free engagement can only be moved by the player whose pieces correspond to the color of the square (black or white) occupied by the piece at any given moment. This player is said to have possession of the piece. Possession also allows a player to leap over the free engagement with a blade, to use it for a double-move by stepping stone, or to perform en passant.
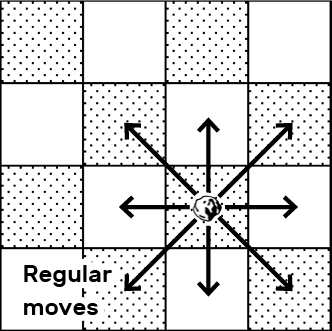
When moving without taking, this piece moves like a king—one square at a time in any direction orthogonally or diagonally on empty squares. When taking pieces, it moves only diagonally forward, as if one of your own engagements.
Below: Four different kinds of movements by the free engagement
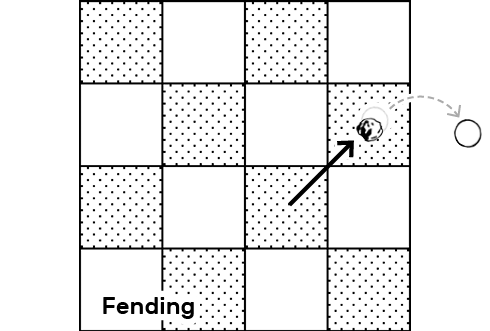
Taking: Like a normal engagement, the free engagement fends other engagements and fendable pieces, but takes nothing.
Vulnerabiliity: The free engagement can be fended by any piece. When fended, the free engagement returns to its starting point.
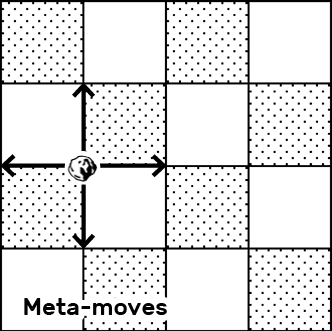
While the free engagement sits out of play, either player can reposition it one point along the intersections of the grid before making a normal move for their turn.
These meta-moves let the players attempt to advantageously pre-position the piece before it actually enters play.
- A meta-move must be made before any normal move of your turn; however...
- You may meta-move and then pass. (For the purposes of the rules of passing, this counts as a pass.)
- You cannot meta-move and then declare intention on the same turn.


Cloak
The Cloak is analogous to the knight in chess, moving one square orthogonally plus one square diagonally (or vice versa) away from where it started the move, in an ‘L’ pattern. The cloak leaps over any pieces in its path.
Below: The Cloak's basic movement
Taking: The Cloak fends all your opponent's fendable pieces and takes only the Lantern (extinguished).
Vulnerability: The Cloak can be fended by all pieces and is taken by the Lantern (burned) and when a blade ends its Blade Capture move (severed).
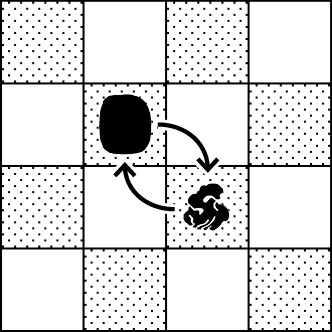
Special move: Feign
When the Cloak and the Self are adjacent to one another (orthogonally or diagonally) they can switch places as a double-move turn.
Below: The Cloak and the Self trade places by feign
Special move: Blade Capture
The Cloak can attack the Sword or Dagger without taking or fending it; instead, it sits atop the blade and keeps it pinned in one place. The owner of the captured blade may not immediately free it. They must spend a later turn if they wish to remove the Cloak (which may also be done in concert with the Self's movement). The Cloak is then destroyed.
However, if on some future turn the Cloak is still in play upon a captured blade, its owner may move it back off, releasing the blade and saving the Cloak.
Blade capture is an attack on the blade, thus it may contribute to disadvantage conditions for disarm. Disarming a captured blade fends the Cloak.
While a blade is captured by the Cloak, neither the blade nor the Cloak can contribute disadvantage to the disarm of a separate armament.
Below: The Sword captured by the black Cloak

Balance
The Balance is analogous to the bishop in chess. It moves one or more spaces along the diagonals, constrained by the edges of the board. The Balance, however, can leap over any piece in its path.
Below: Examples of the Balance's diagonal movements
Taking: The Balance fends all your opponent's fendable pieces and takes the Jutsu (transcended).
Vulnerability: The Balance can be fended by all pieces and taken by the Guard (bludgeoned).
Due to its pattern of movement, note that the Balance can only reach half the spaces on the board, like a black-square or white-square bishop in chess, unless placed alternately out of reserve or via the use of its special move, Shift.
Aspect: Control
The Balance in the Self's measure prevents an opponent's Jutsu from entering (by movement or attack), and entering the opponent's Jutsu-occupied measure with your Balance and Self fends their Jutsu.
This can be invoked in the moment in order to fend a sitting Jutsu or prevent its movement into a measure, but cannot be remembered and invoked on a turn later than when the relevant move occurred.
Special move: Shift
The Balance can shift to trade places with the Sword or Dagger anywhere on the board, assuming the blade piece's destination is within its normal constraints.
This move cannot be used in concert with the Self's movement, nor as the second in a double-move by engagement, because these are triple-moves.
Below: The Balance and the Sword trade places by shift


Dagger
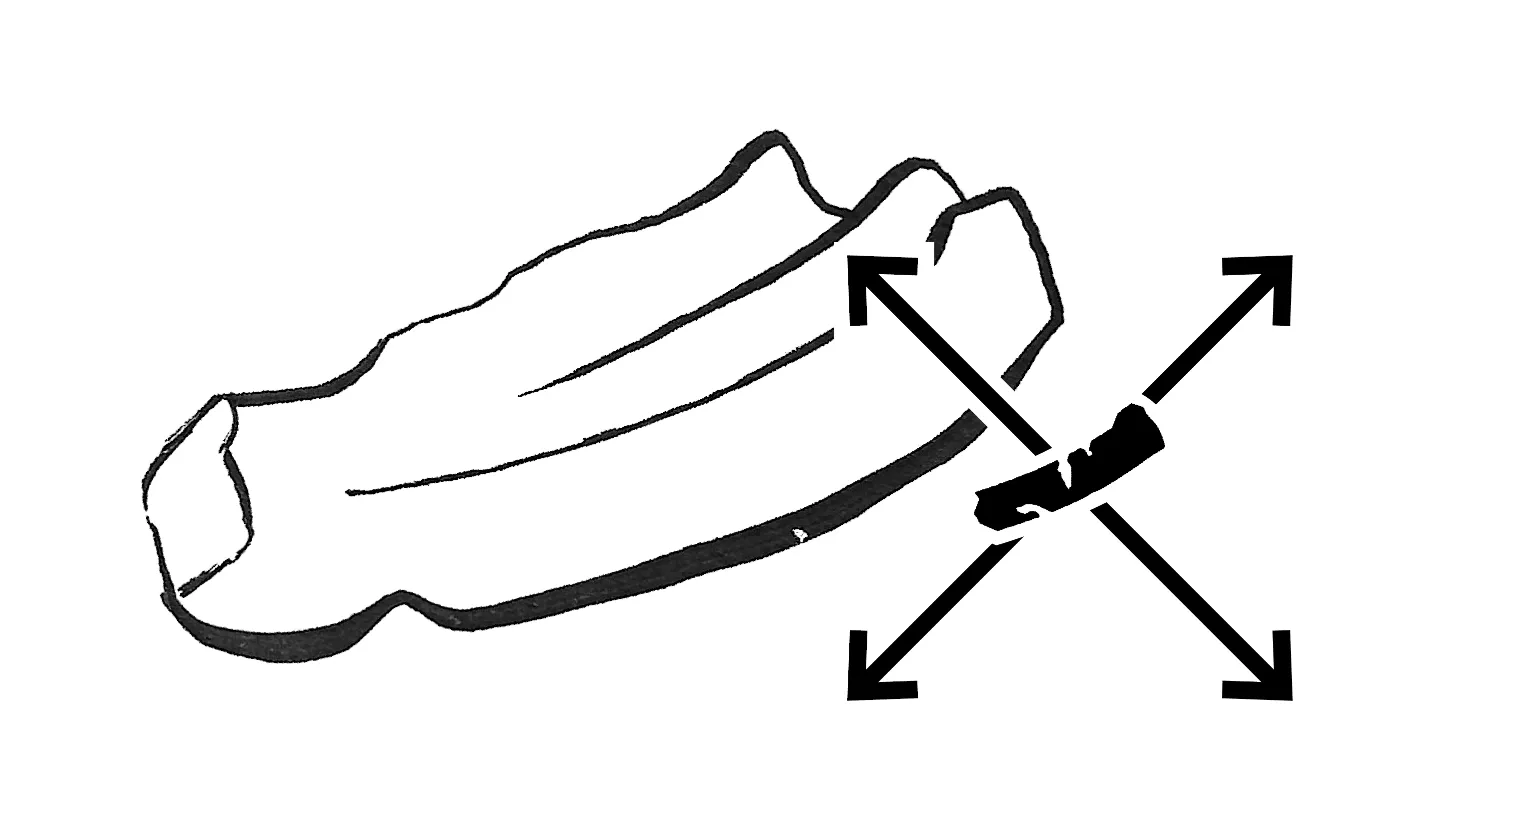
The Dagger is an additional reserve piece which can be put into play as a turn (as are all the pieces that follow). It moves like the Sword but cannot leap, and it is constrained to the same measure as the Self and one measure outside. If the Dagger is left outside of constraint to the Self, it can only move to a square back into constraint with the Self.
The Dagger cannot be used to execute disarmament unless you have lost your Sword.
Below: An example of the Dagger's range and available movements.
Taking: Just as the Sword, the Dagger fends all your opponent's fendable pieces unless it can take as follows…
- Balance is never taken, only fended.
- Lantern is always taken, directly (shattered).
- Cloak is only taken in counter-action, by cutting free from its special move (severed).
- Jutsu is taken indirectly, by fending Balance (shadow-stabbing).
- Engagements are only fended.
- Armaments — Sword, Guard, and Dagger — are taken only via conditions of disarmament.
- Self is taken directly, as checkmate.
- Ruin/Rien cannot be taken or fended.
Vulnerability: The Dagger cannot be fended, and can only be taken by the opposing player's Sword (or Dagger, if their Sword is lost) via disarm conditions.
When your Dagger is in play, as it is an armament, you may choose to move it in concert with your Self piece.
Special moves: Cavazione & Opposition
The Dagger can make use of cavazione and opposition, the special moves of the Sword, but only against the opponent's Dagger.
Aspect: Persistence
If you lose your Sword, but you already have a Dagger in play, you may continue to fight. The Dagger gains the ability to execute disarmament in place of the Sword.
You cannot put your lost Sword back into play, and you cannot put your Dagger into play upon losing your Sword; it must be already active in order to prevent checkmate by disarmament of the Sword.
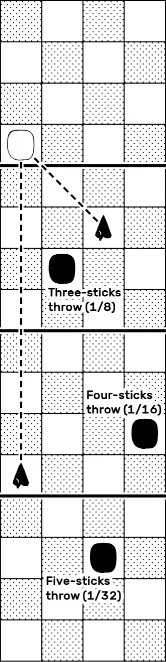
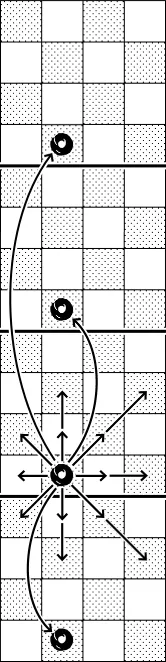
When the Dagger and the opponent's Self are aligned unobstructed by any piece other than engagements, the Dagger can be used for a long-range attack from any distance.
- Success on the attack is determined by chance. The standard method of rolling for this is with a set of five stick-dice. (These could be knucklebones, flat popsicle sticks with one side of each painted black, or square-sided sticks with two adjacent sides on each black, or two-sided round/flat Senet-style throwing sticks. …Or even just consecutive coin-flips. See alternate methods in the reference section of the full rules.)
- The number of sticks thrown is three plus the number of measures between the two Selves.
- The attacker throws for their piece color, white or black.
- If Black's throw lands all black-side-up, for example, the attack is a success and constitutes checkmate by touch.
- If the attacker throws only one off-color, the attack misses but grants a short-success distraction effect which allows the throwing player to reposition their Self piece and the Sword anywhere on their side of the board and behind the opponent's Self's step, otherwise irrespective of movement and range constraints, without taking pieces.
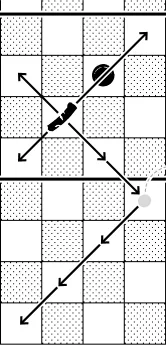
You may use the Dagger Throw ability in concert with a Self move. You may also throw as the second in a double-move by stepping stones with the Dagger.
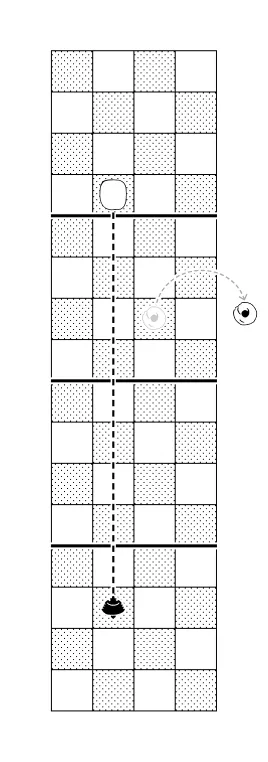
Below: Two examples of Dagger Throw attacks (dashed lines) and three positions with different odds of success (labeled Self pieces)

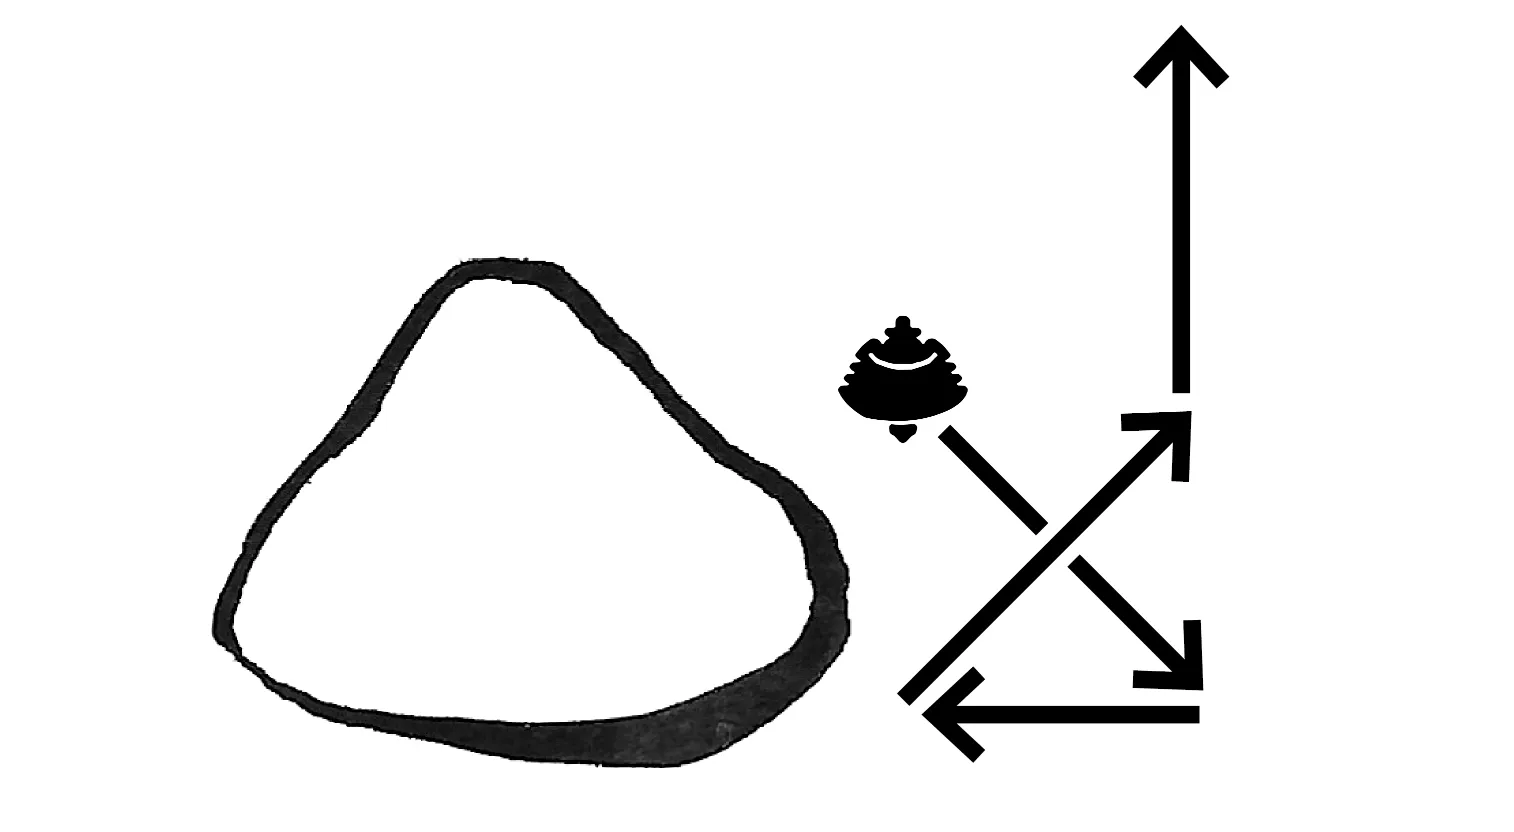
Guard ...or “Ward”
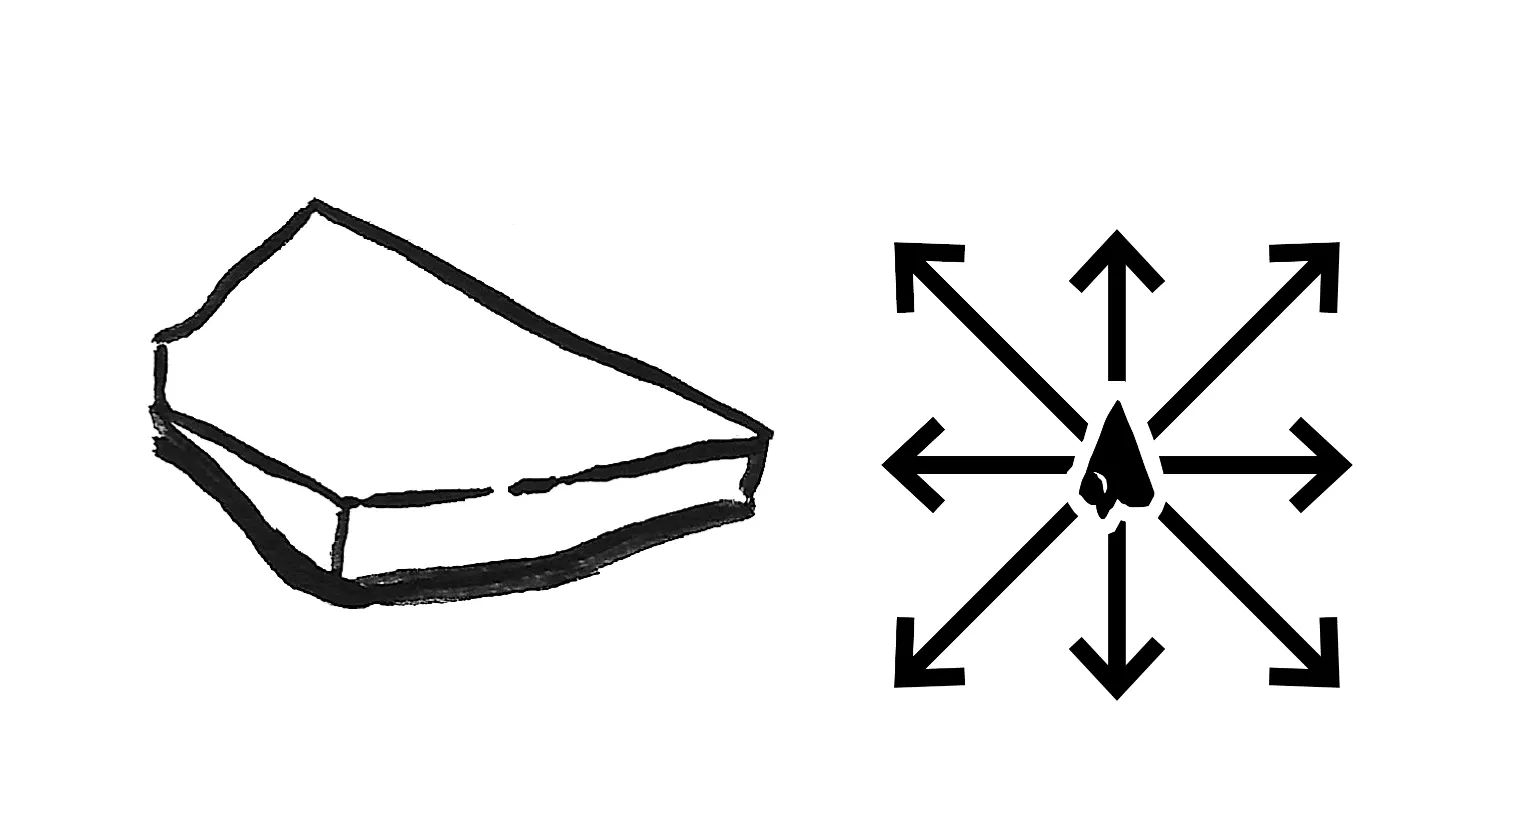
The Guard moves like a rook, one or more spaces orthogonally (in a step or line), or one square diagonally in any direction—these amount to the "Dragon King" piece movement from Shogi. However, its range is tightly constrained to the Self's measure and one step outside. If a Guard is left out of constraint to the Self, it can only move to a square back into constraint with the Self. It cannot leap over pieces.

Below: An example of the Guard's range and available movements.
Taking: The Guard fends all your opponent's fendable pieces and takes the Balance (bludgeoned).
Vulnerability: Cannot be fended, and is taken only by the Jutsu (subverted) and by the blades via disarm.
Aspect: Armament
When your Guard is in play, you may choose to move it instead of a blade in concert with your Self piece. It cannot be fended as other technicals can.
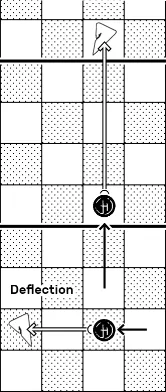
Special move: Deflection
The Guard is able to deflect an armament and push it away if there is at least one open square immediately behind the latter and as long as the Guard doesn't move outside its constraints.
The Guard takes the square of the blade it deflected. If this square is on your side of the board, the opponent's blade is pushed away until it crosses back onto their side, or until it is blocked (by a left or right edge of the board or another piece in the way). If the taken square is on the opponent's side of the board, deflection pushes the blade piece only one square. Deflection “backward” (toward your end of the board) only pushes the opponent's blade one sqare.
This can be the second in a double-move by stepping-stone or a move in concert with the Self.
Below: The Guard deflects the Sword back across the center line; The Guard deflects the Sword sideways to the edge of the board.

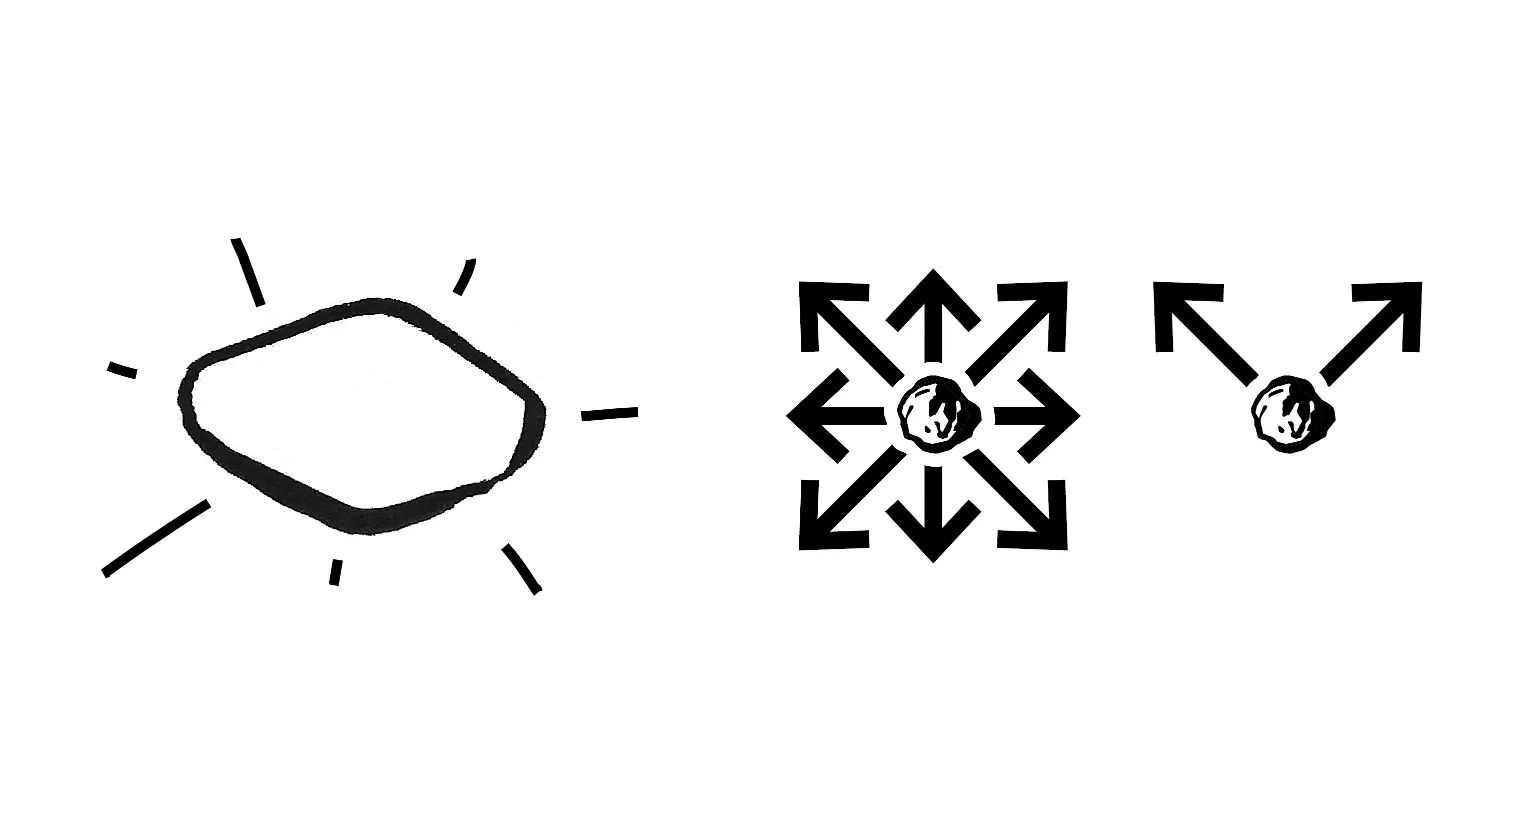
Lantern
The Lantern is a strange piece. Its basic movement is diagonally and orthogonally, like a queen, but it can only move more than one space. Also, it is initially constrained to the Self's measure. When the Self moves out of that constraint, the Lantern moves by flailing either back into measure with the Self or one further, swinging like a pendulum.
The Lantern cannot jump over pieces except those in the adjacent measure it passes into or over when flailing. It can never jump over pieces in the same measure as where it starts a movement (see: “Flail” special move below for more in-depth description of this movement pattern).
Below: Example sequence of possible Lantern movements within its constraint to the Self, without flailing.

Taking: The Lantern fends all your opponent's fendable pieces and takes the Cloak (burned).
Vulnerability: The Lantern is fended by any piece, and is taken by the Cloak (extinguished) or by either blade (shattered).
Aspect: Pseudo-Armament
When your Lantern is in play, you may choose to move it instead of an armament in concert with your Self piece.
Note that although the Lantern isn't technically subject to disarm conditions, it is nevertheless destroyed by any attack from a blade.
Special move: Flail
When the Lantern is left out-of-constraint by the Self having moved away into another measure, it can move either back into-measure with the Self or one measure further in that direction, on the opposite side of the Self from where it started the move (as if swinging). Also, it can leap over any pieces in the next measure it passes into/over, like a flail whipping around obstacles.
The flailing Lantern can only leap over pieces in the next measure if its path isn't first obstructed by any pieces in the measure where it begins the move. (In fairy chess piece terms, this is like a slide-then-leap move. Think of it as requiring momentum to leap.)
Below: One example of a flailing Lantern move. Many more complex variations are possible.
Aspect: Glare
The Lantern emits light. When it aligns with the opponent's Self (orthogonally or diagonally) unobstructed by a Guard, Cloak or your own Self, the opponent's Jutsu is fended. This can be declared at any point on your own turn when the position allows, and does not constitute a move for the purposes of move-count. However, using glare ends your turn.
The opponent affected by glare may not immediately replace the Jutsu on their next turn.
Glare conditions while the opponent's Jutsu is in reserve may prevent its placement until glare is broken. You may also be invoke glare to prevent a Dagger Throw.

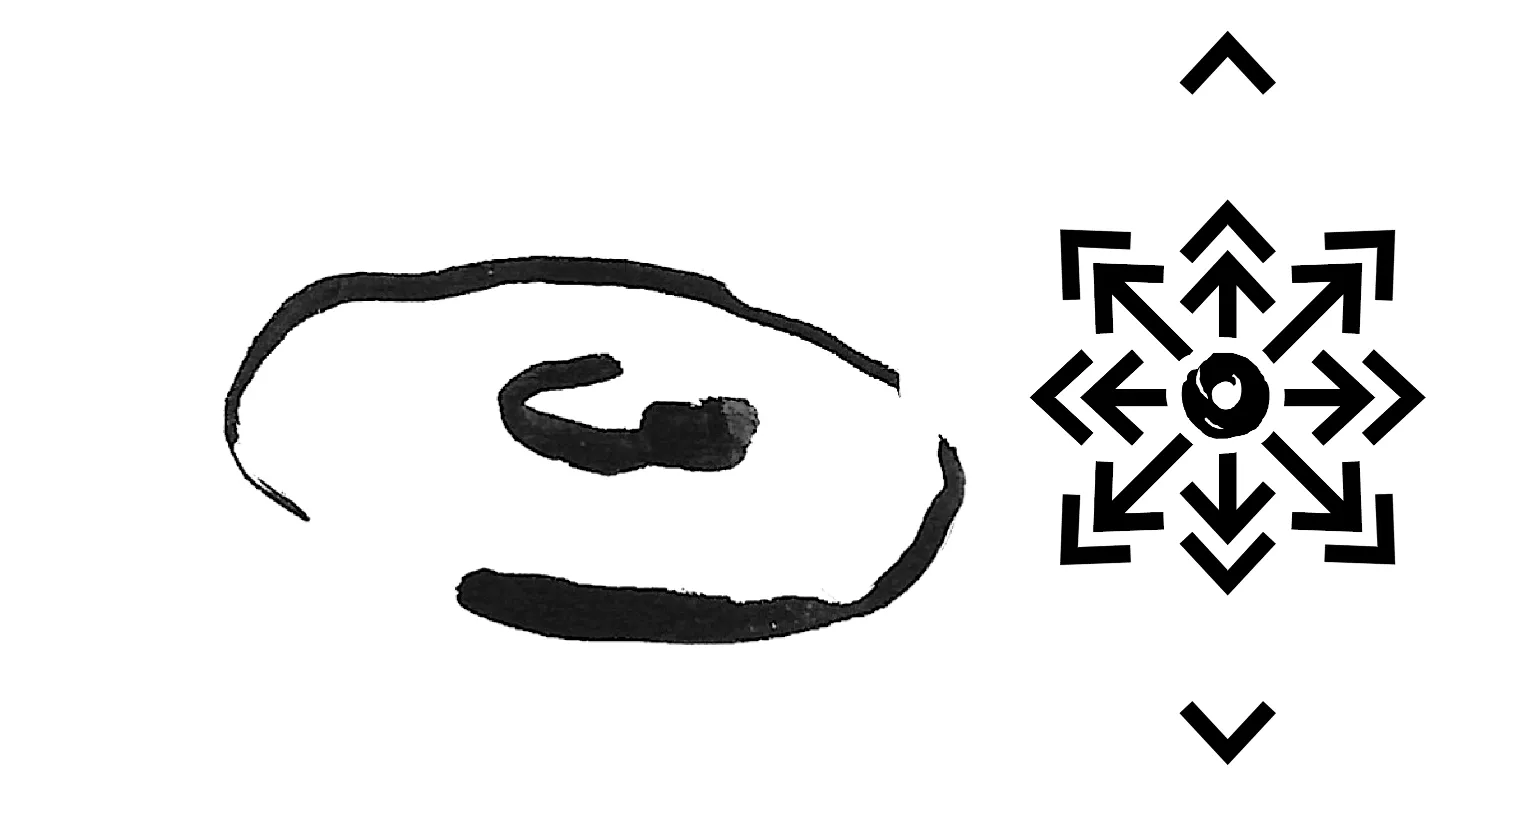
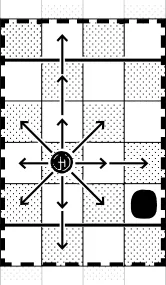
Jutsu
This piece moves one or two squares (leaping) in any direction or blinks to the corresponding square in any measure.
Below: examples of the Jutsu's movement
Taking: The Jutsu fends all your opponent's fendable pieces and takes the Guard (subverted) as well as the opponent's Jutsu and itself simultaneously in negation.
Vulnerability: The Jutsu is fended by any piece and taken by the Balance (transcended), by the Jutsu (negated), or via an opposing blade fending the Balance (shadow-stabbing).
Aspect: Presence
Your Jutsu's presence in the same measure as your Self piece prevents your opponent from placing any pieces from reserve into that measure.
This can be invoked in the moment in order to call piece placement untenable, but cannot be remembered and invoked at a later time to dispute the previous piece placement.
This is an attempt to simulate the “feint” in fencing. It is a complicated, unproven work in progress. Probably don't worry about it.
OPTIONAL PIECE:

Ruin/Rien
The Ruin or Rien is an inert blocking piece which has three defining characteristics:
- Moves pathlessly to any open square within the Self's measure or one measure outside but cannot move within the opponent's Self measure.
- Cannot take or fend any piece.
- Cannot be taken or fended.
Aspect: Floating Ruin
The Ruin can be placed from reserve anywhere in its movement range, ignoring the constraint of the piece-placement area.
Using the Ruin in a game has two specific effects. Most obviously, it offers quick, solidly blocking defense against straight-line direct attacks. However, it may ultimately prove useless against more complex attacks, while also expending turns in order to place and reposition the piece.
Aside from these calculations, in general it adds another element of complexity to the shape of the fight at the center of the board.
Placing Pieces from Reserve
Your pieces in reserve can be placed on the board as a turn. Pieces that have been taken / lost to discard cannot be placed, and you can never place a piece as one part of a double-move.
Pieces can be placed only on empty squares adjacent to the Self, and range constraints still apply.
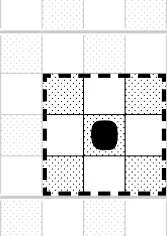
Below: Black's piece-placement area is within the dashed line, on any empty square adjacent to the Self.
Withdrawing Pieces
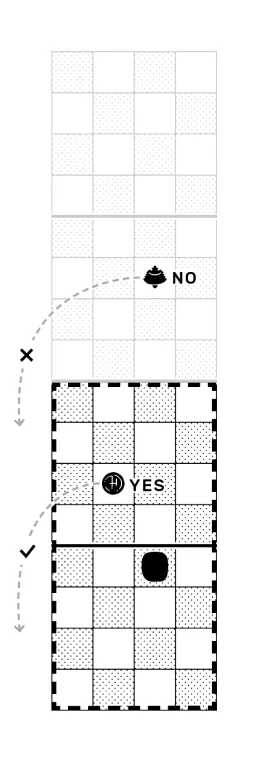
Players may withdraw their own pieces into reserve only from their own side of the board, excluding of course the Self piece and the Sword, as well as the Dagger if it is one's only remaining blade (unless you want to resign dramatically).
Below: Black may not withdraw the Lantern, which is on the opposing side of the board, but they can withdraw the Guard..
Disarm
The Sword takes opposing armaments via disarm conditions. If the Sword has been lost, the Dagger is used to execute disarmament. Disarm conditions exist when either…
A. The disarmed piece is overextended in a measure outside its range constraints.
B. The disarmed piece is disadvantaged under attack from a blade and direct attack from a technical piece simultaneously:
- For example, if your opponent's Sword occupies a square within the paths of both your Balance and Sword at once, you may disarm their Sword with an attack by your Sword.
- The attacking blade makes the move to take the disadvantaged armament. The other piece involved in the attack stays put.
- A technical piece supporting for disadvantage in a disarming attack cannot do so via speculative double-move (by engagement or any other means); it must directly “see” the disarmed piece. The attacking blade which performs the disarm may do so by double-move.
Below: White's Sword is both overextended and triply disadvantaged (though just one of these would suffice for a disarm). Black's Sword can use the engagement's stepping-stone facilitation to double-move and disarm for checkmate.

Your attacking blade should, of course, stay within range constraints while performing the disarm. Failure to observe this could result in simply having the move called untenable and reverted, losing the piece by penalty, or even the opponent opting to disarm you in return. It will help to understand the concepts of “playing with sand” and untenable moves (links to full rules) in order to navigate these ambiguities.
If the disarmed player has no blade left on the board, disarmament constitutes checkmate with no possibility of double-checkmate in return.
Double-Moves
This section has been cut from the short rules. It was an attempt to exhaustively and holistically define our terminology around double-moves, and it was written without knowing the word “ply”—a term from game theory which will facilitate rewriting at another time.
To summarize, each player can only make a maximum of one or two moves total in a turn. A double-move can be made via only one of the many methods of double-move, even if the conditions for more than one method are available.
In order to perform a valid double-move, you may physically touch-move square-to-square either one piece twice or no more than two of your own pieces once each on your own turn (not counting removed step-stone engagements).
Immaterial Actions
This is another section having to do with a different aspect of the definition of a move. The components of this subject are already covered elsewhere in the rules, but you can see the full game rules to read this section.
In short, the three “immaterial actions” in the game are currently the free engagement's meta move, the Lantern's glare, and the Jutsu's intention. These actions are not moves per se, and doing them alone is equivalent to a pass wrt the rules of passing.
To navigate the ambiguities around when a turn has ended, you may wish to indicate that you're finished making a chain of special and optional meta-moves, etc., by saying “your move” or “…to you,” or “à toi” if you're fancy, although the use of a turn-counter obviates the need for this. (See also: Passing and Custom Rules & Extra) in the long version.
Passing
A player may choose to pass a turn, but if the opponent then also passes, the first player who passed must now make a move on the board. In other words, a maximum two passes can occur consecutively.
This effectively means you can pass unless the other player denies it.
The three immaterial actions (meta-move, intention, and glare) will not suffice to respond to this forced move.
Devices of Art & Mysticism
The devices consist of a handful of special moves created by interactions between two or more pieces with an effect on a separate piece or on the rules of the game itself.

Shadow-Stabbing: When your opponent's Balance is on your side of the board, fending it with a blade takes the Jutsu regardless of whether it is on the board or in reserve. The Balance, fended, goes into the opponent's reserve. This is a common part of the mechanics of fighting pieces, but since it involves more than just one piece taking another, it belongs in the category of devices and neatly exemplifies them.
Setting Up & Beginning a Game
1. For a basic game, the first thing two players must do is agree on the terms of the veney:
- Are you playing a casual game or a formal game, with tokens?
- Will you play a friendly game allowing both players or a less experienced player to revise a move? Will the touch-move rule apply? Likewise, what will happen if someone attempts to make an untenable move?
- Will you be using the full standard set of pieces, removing any of them, or adding custom pieces?
- How will you roll for an attack with the “Dagger Throw” special move? (This is likely determined by whatever is available in the set.)
2. Next, depending on the set of pieces and personal preference, players may choose a token to use as the free engagement. If playing a formal game with a unique Self, a.k.a. “playing for keeps,” each player will also provide a token to play as their Self piece.
To avoid confusion and blundering, some consideration may be necessary to keep the board visually readable. For example:
- The player using the black pieces shouldn't pick a white Self, and vice versa.
- Neither Self token should closely resemble the key distinguishing qualities of any other piece in the set without its own superiorly-distinguishing qualities.
- The free engagement shouldn't more closely resemble one side or another, or one token or another. (It helps to use one that is neutral gray or notably different in color, perhaps transparent, refractive or reflective.)
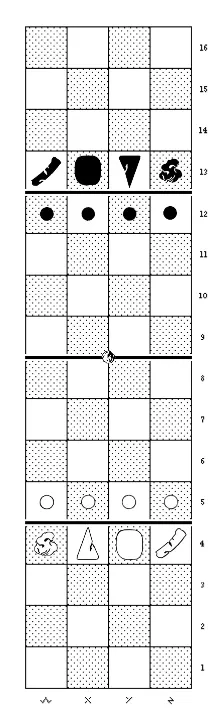
Below: Default starting position
3. Set up the board. Each player starts a standard game with the Self, Sword, Cloak and Balance, plus their four engagements. The rest of your pieces begin the game in reserve. Setup of the board is done using any one of several styles. Read more about them in the full rules.
Place reserve pieces at the edge of the board on your own side. Keep your piece container/s or a shallow dish ready for any pieces that will be discarded during the game.
4. Determine who goes first. This can be decided by advantage, or by random drawing, for example.
- Advantage: If one player is known to have more experience or skill than the other, they might simply allow the newer player to go first.
- Random drawing: In a game set up on the standard baselines, the two players may decide who goes first by chance. A common method of determining this comes from chess. One player holds the free engagement in a closed hand with both hands behind their back or under the table, then offers their closed hands to the other player, who guesses which hand contains the piece. If they guess right, they go first.
Now you may begin. The player determined to go first may make any allowed move, or even pass!
Impasse & Other Edge Cases
Some of this game's inversions and ignoring of strict chess conventionalities can result in rare but frustrating situations which are nevertheless quite possible in real fencing. Here, they mostly result in draws, resets, or disregarding the circumstances:
Impasse — Quibbling over the free engagement: If the free engagement is pushed back and forth at length and returned to its starting point by repetition twice consecutively, either player can declare a reset of the entire board on their own turn unless/until a move is made by a piece other than the free engagement before that declaration. The other player's turn follows.
Impasse — Non-fencing: If the players confuse or disinterest themselves with too many passes, repetitions of the free engagement, too many untenable moves, Ruin moves, or making repetitious moves without taking or fending any pieces for many turns, they are simply not fencing, and the game may be called a draw. Another likely scenario is the possibility of accidentally mismatched board states during a correspondence game (due to error or misunderstanding of the rules/notation).
Disarm from death: (Also known as “fencing with a sword in your heart.”) If a touch-checkmated player is able to disarm in return on the next move (on the space formerly occupied by their own Self piece), it is not a double-checkmate, and the disarmed player still wins with checkmate by touch.
The Self cannot move after checkmate. In the rare event that a player checkmated by Sword-takes-Self may wish to double-checkmate in return using their Dagger (which may be blocked by their own Self and/or has a potentially shorter range than the Sword), concert may not be used to facilitate the double-checkmate. This is because in a checkmate by touch, the blade takes the Self, and the taken Self is dead on the spot—it cannot move from the position where it was taken.
The fact that you can double-checkmate in return but may not immediately see the possibility means that when a checkmate by touch occurs, the board should not be cleared right away. Although the winner may declare victory and leave the table, a victory is not official until the loser either acknowledges it or leaves the board. Should the winner be able to logically demonstrate that the game is definitely over, this would also suffice. In the absence of such a definitive analysis, however, if the checkmated player refuses to admit defeat, they are welcome to continue to assess the board until they notice their opportunity for double checkmate; and, if they take it, both players lose. If time control is in use, checkmate by touch results in an immediate reduction of the checkmated player's clock to a few seconds, so that they must find the move in time before death.
Endings
- Checkmate by touch
- Checkmate by disarm
- Double-checkmate by touch
- Checkmate by self-disarm (via missed roll on the “Dagger Throw” attack)
- Resignation (by yielding, abandonment, or by exceeding the retreat limit)
- Draw by agreement
- Draw by no contest (impasse/non-fencing)
The device known as “Death Spell,” described in the full version of the rules, could be considered an eighth type of ending, but it is basically a checkmate by touch or disarm.
Untenable Moves
“Untenable” refers to a move which breaks a rule, most likely one regarding range constraints and double-move combinations. This is the same concept as an “illegal” move in chess, but legality is not the paradigm here.
An untenable move can be called out by the opponent or graciously by the player who made it, but only immediately after the move is made. In a friendly game, the move is reset, and the player can then make an allowed move. However, if the untenable move is made by an armament piece moving outside its range contstraint, the other player may prefer to disarm their opponent, if possible, instead of calling the move untenable.
You've reached the end of the short version. The full-length version describes certain edge-cases and digs into the mechanics of the pieces in a way that hopefully clarifies such situations. I also attempt to convey more of the spirit of the game and the experimental possibilities of different modes of play. After these additional rules sections, there is a piece of writing about the game's background. Read the full version here.
